Getting Started
What Stynar helps you manage
Stynar is an email automation platform that helps teams create, manage, and scale outbound email campaigns. From importing leads to sending personalized emails, tracking campaign performance, and managing sender accounts, everything is organized into dedicated workspaces designed for efficient outreach.
The platform is built around six core areas:
Dashboard
The Dashboard provides a centralized view of emails, campaigns, and leads, helping you monitor outreach performance across customizable time ranges. Analyze sending trends and access detailed campaign insights to track progress and performance.
Campaigns
The Campaigns page serves as the central workspace for creating, managing, and optimizing email outreach campaigns. Monitor campaign performance, analyze detailed campaign insights, apply advanced filtering and search capabilities, and export reports to support data-driven decision-making.
Leads
The Leads page serves as a centralized workspace for importing, organizing, and managing prospect data. Upload leads via CSV, add contacts manually, group and assign leads to campaigns, and leverage advanced search, sorting, and filtering capabilities for efficient lead management.
Templates
The Templates page provides a centralized workspace for creating and managing reusable email templates. Build templates using the Visual Builder, Plain Text Editor, Code Editor, or AI assistance, and organize them into categories for efficient content management and reuse.
Prompts
The Prompts page provides a centralized workspace for creating, managing, and reusing AI-powered prompts. Customize content generation by configuring tone, length, and other prompt settings to ensure consistent, personalized, and effective communication across campaigns.
Email Accounts
The Email Accounts page serves as a centralized workspace for managing your email sending infrastructure. Connect Gmail, Outlook, and SMTP accounts, manage verified domains and DNS records, and monitor Google Postmaster status to maintain deliverability and sender reputation.
Getting Started
Recommended setup path for a safe first campaign
Create an account
Sign up for a new account or log in to an existing workspace using Google, Microsoft, or email and password authentication to access the platform.
Complete onboarding
Provide your basic information and complete the onboarding process to personalize and configure your workspace.
Configure email sending
Connect a Gmail, Outlook, or SMTP account, or add and verify a sending domain with the required DNS records to enable email delivery.
Create a campaign
Create a new campaign by providing a campaign name and configuring the basic campaign settings required for outreach.
Import leads
Upload a CSV file or add contacts manually, then review, validate, and organize your lead data before using it in a campaign.
Configure email content and template
Create or select an email template, define the subject and message content, optionally leverage AI-powered prompts, and assign the sender account(s) for campaign delivery.
Schedule delivery
Configure sending schedules, daily sending limits, and delivery preferences to control campaign execution.
Review campaign settings
Review campaign details, leads, sender accounts, email content, and scheduling configuration to ensure everything is ready for launch.
Launch your campaign
Launch the campaign and monitor email activity, campaign progress, and performance insights through the Dashboard and campaign reports.
First send recommendation
Related guides
Getting Started
Understanding the Dashboard
The Dashboard provides a centralized view of email activity, campaign performance, and lead growth. Use key metrics, activity trends, and campaign insights to monitor outreach performance and identify opportunities for optimization.
The dashboard provides a high-level summary of email activity, campaign performance, lead growth, status distribution, and recent campaign activity.
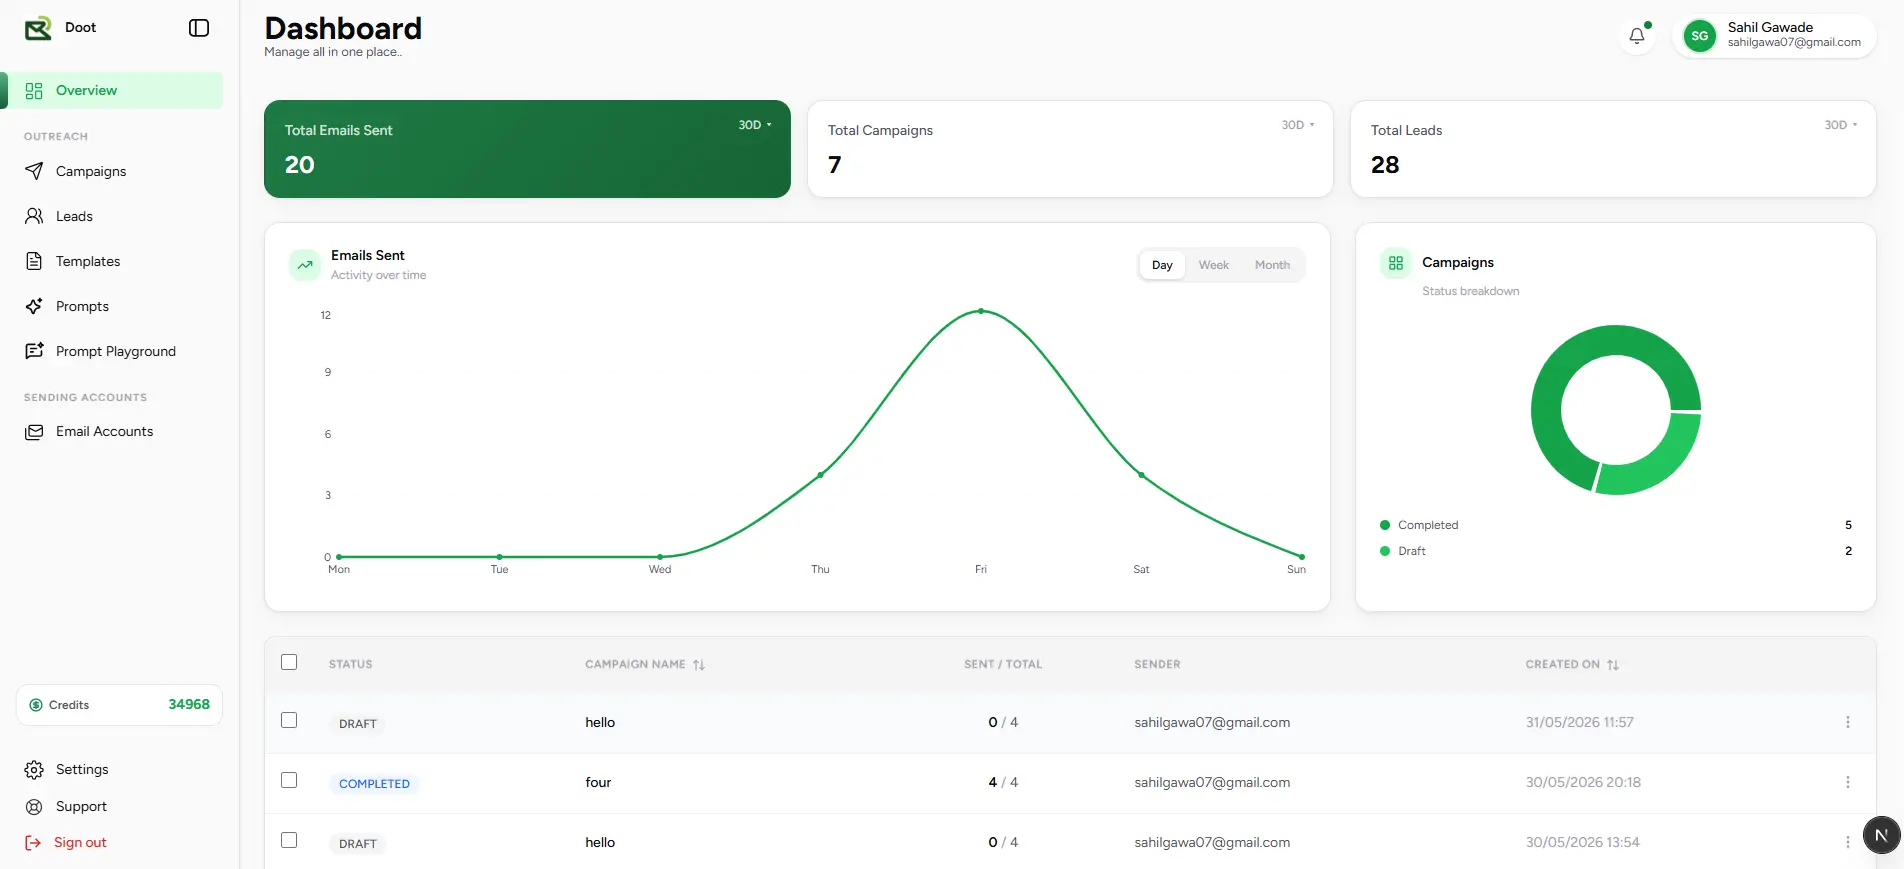
Volume
Total Emails Sent
Displays the total number of emails sent during the selected time period.
Campaigns
Total Campaigns
Shows the total number of campaigns created within the selected date range.
Audience
Total Leads
Represents the total number of leads available for outreach.
Email Activity Trends
The Emails Sent chart visualizes email activity over time and supports daily, weekly, and monthly views to help identify outreach trends and sending patterns.
Campaign Status Distribution
The campaign status chart provides a breakdown of campaign states such as Draft, Active, Paused, and Completed, helping you quickly understand the current status of your outreach pipeline.
Recent Campaigns
The campaigns table displays recently created campaigns along with their status, sender account, email progress, and creation date. Select any campaign to access detailed campaign information and performance insights.
How to use dashboard metrics
Campaigns
Understanding the Campaigns
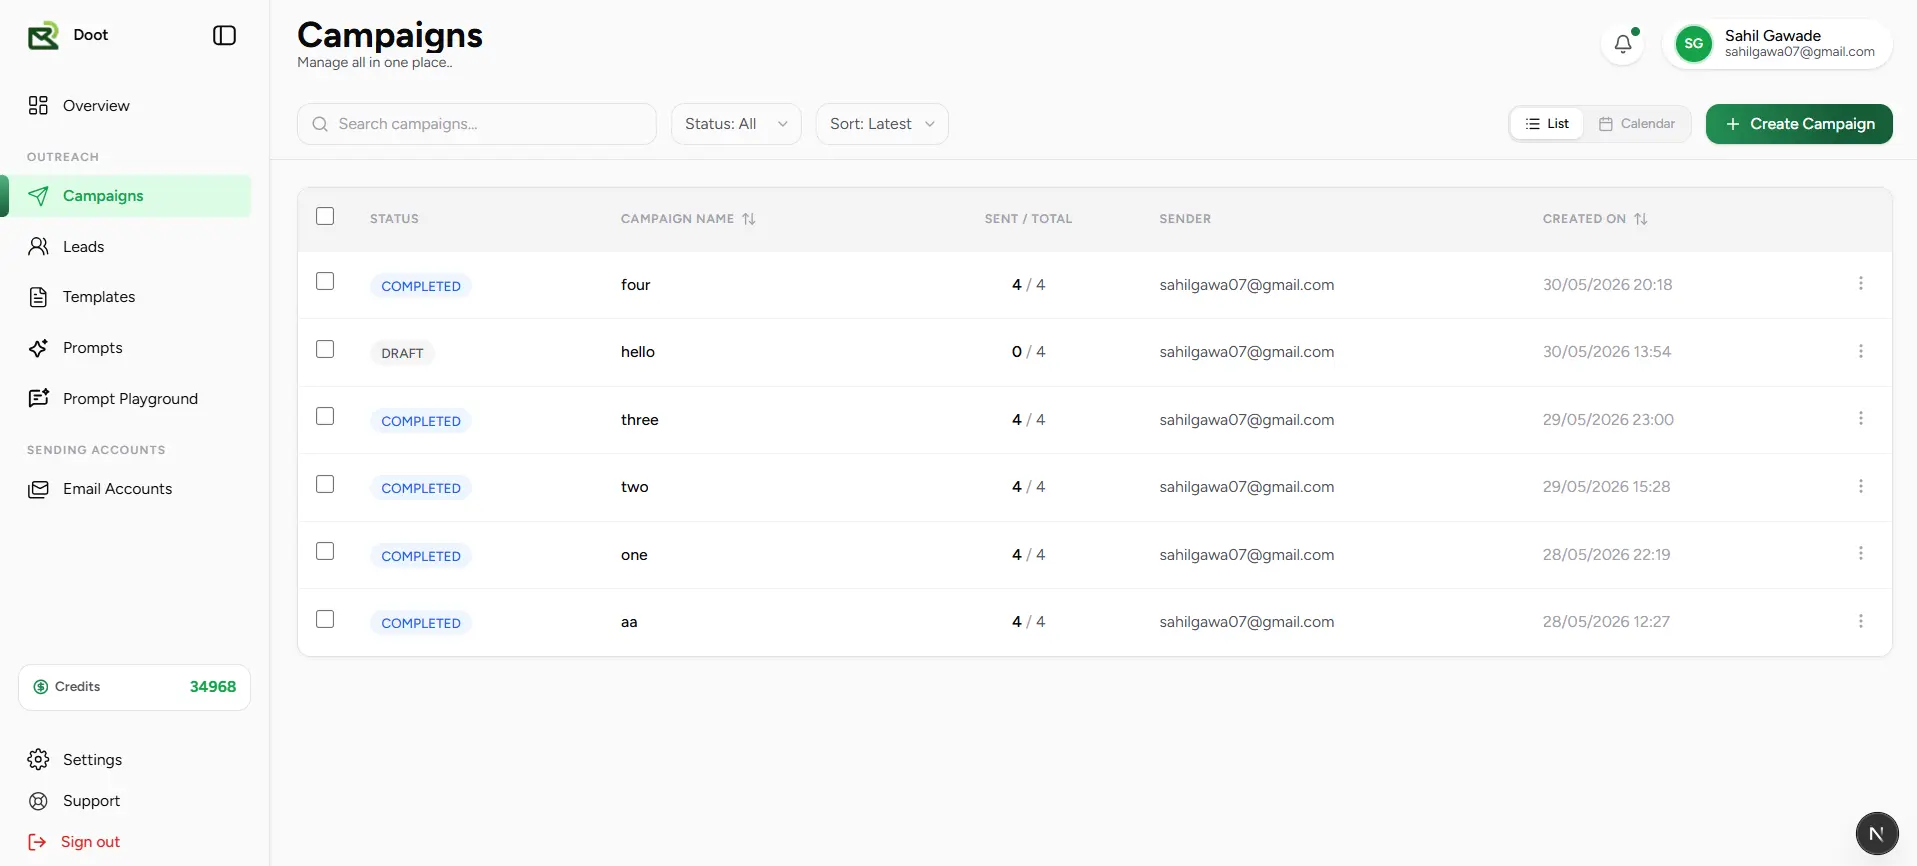
The Campaigns page serves as the central workspace for creating, managing, and monitoring email outreach campaigns. Track campaign progress, manage campaign settings, analyze performance, and access detailed campaign information from a single location.
Campaign Creation
Create new campaigns and configure audience, email content, scheduling, and delivery settings.
Search and Filters
Quickly locate campaigns using search, sorting, and status-based filtering options.
Calendar View
View campaigns by date, monitor scheduled activity, and create campaigns directly from the calendar.
Performance Monitoring
Track campaign activity, delivery progress, and overall campaign performance.
Campaign Details
Access comprehensive campaign information including leads, email content, scheduling, and delivery status.
Reports and Exports
Download campaign reports and review outreach data for analysis and reporting.
Campaign lifecycle
Campaigns
Create a New Campaign
Creating a campaign is the first step in launching an email outreach workflow. Start by creating a campaign and providing the basic campaign information before configuring leads, email content, scheduling, and launch settings.
The campaign builder separates campaign setup into guided steps for easier configuration and validation.
Steps to create a campaign
Follow the steps below to create a new campaign and proceed to audience configuration.
Prerequisite: Configure a sender account
Navigate to Campaigns
Open the Campaigns page from the main navigation menu to view and manage all outreach campaigns.
Create a campaign
Click the Create Campaign button and enter a unique, descriptive name for your campaign.
Review campaign details
Verify the campaign name and basic configuration before proceeding to audience setup.
Continue to lead setup
Click Next to proceed to the Leads step, where you can import contacts and configure audience data.
Campaigns
Import and Configure Leads
The Leads step allows you to define the audience for your campaign. Import new contacts, select existing lead groups, map variables, and review lead data before proceeding to email configuration.
Import contacts, map lead variables, and review audience data before continuing to email setup.
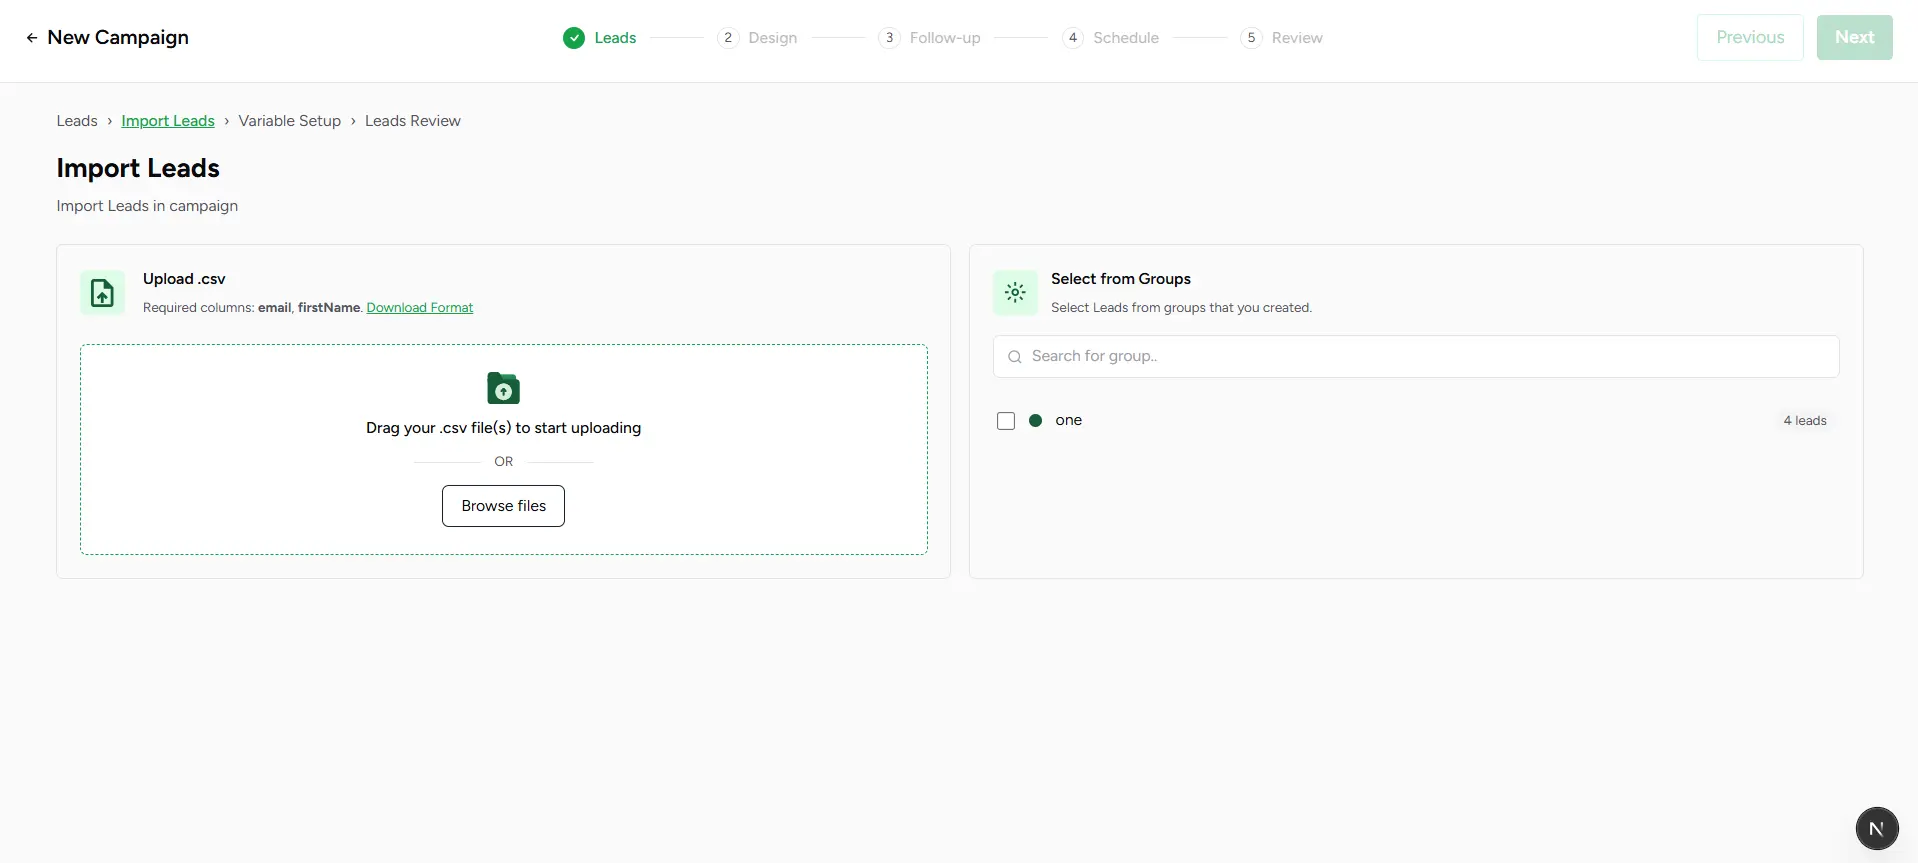
Leads setup workflow
Import leads
Upload a CSV file containing lead data or select one or more existing lead groups from your workspace. Once the audience is selected, click Next to continue.
Map lead variables
Match CSV columns to the appropriate lead fields such as First Name, Last Name, Email, Company, and custom variables to enable accurate personalization.
Review imported leads
Review imported contacts, edit lead information if required, and resolve validation issues before proceeding to the next step.
Required lead fields
Next step
Campaigns
Configure Email Content and Delivery
The Design step allows you to configure the email content that recipients will receive. Define the subject line, select sender accounts, optionally leverage AI-powered personalization, and design the email template before proceeding to scheduling.
Configure email subjects, sender accounts, AI prompts, and templates before scheduling campaign delivery.
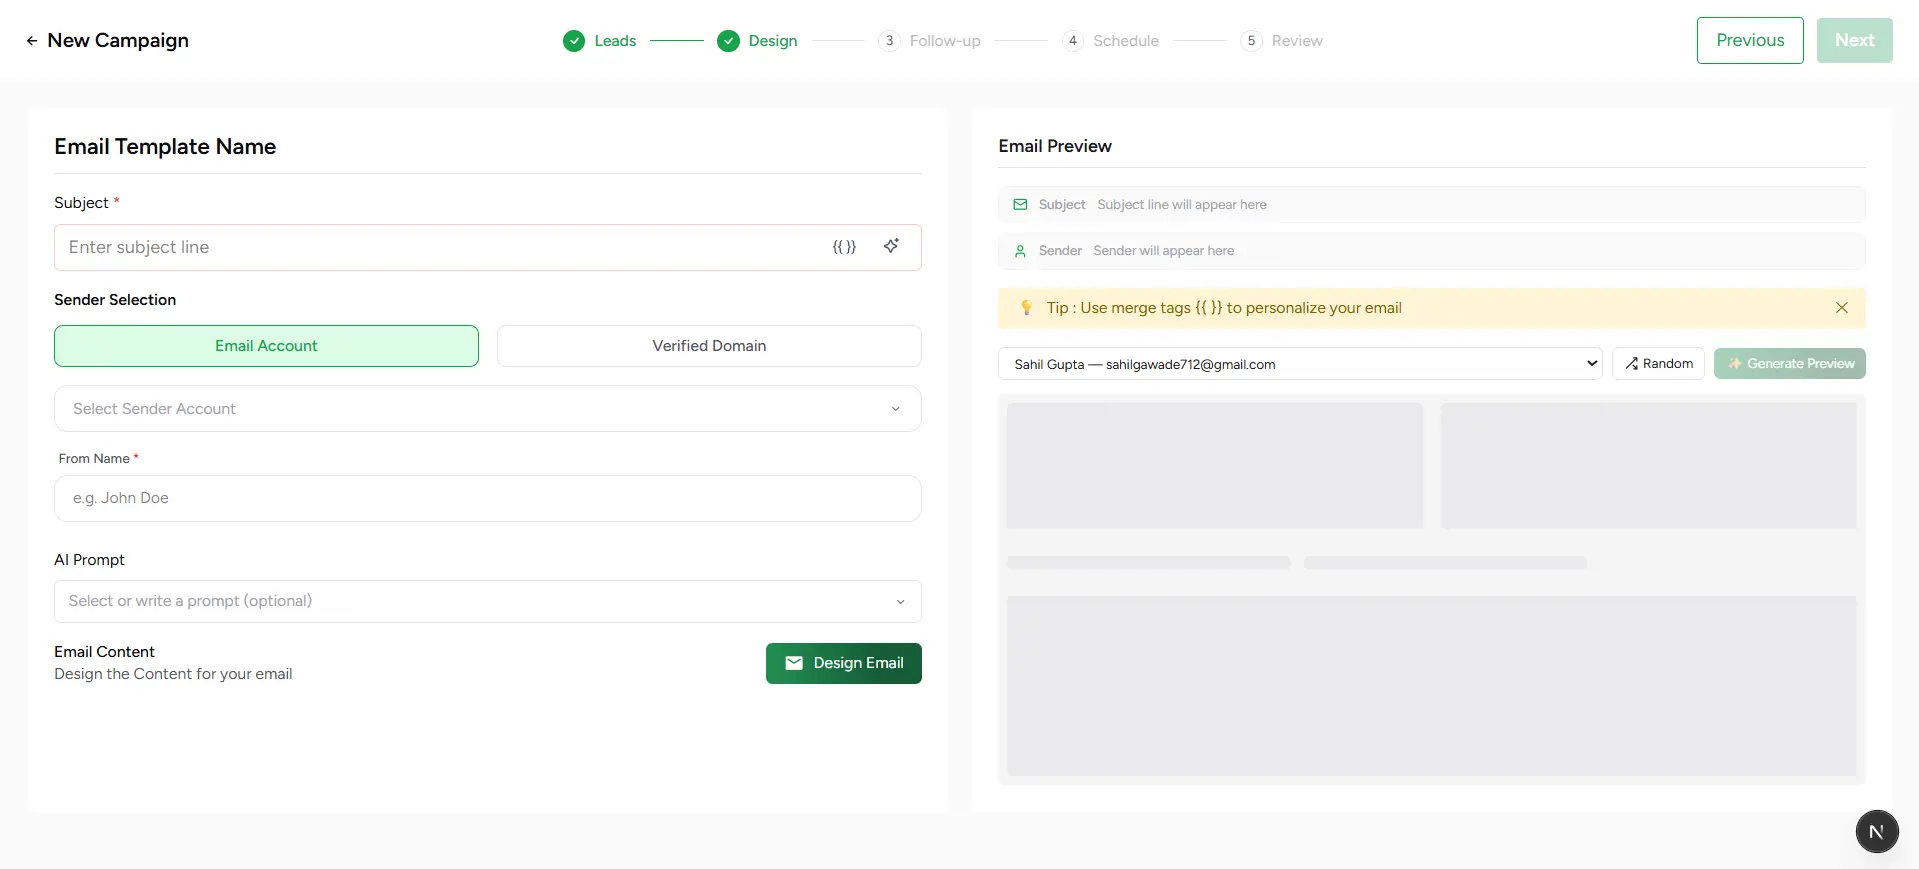
Email configuration workflow
Configure email subject
Create a subject line manually or generate suggestions using AI. Personalization variables can also be included to create dynamic subject lines for each recipient.
Select sender accounts
Choose one or more connected Gmail, Outlook, SMTP accounts, or verified domains that will be used to send campaign emails.
Choose an AI prompt (Optional)
Select a saved AI prompt or create a custom prompt to generate personalized email content based on lead information and campaign goals.
Design the email template
Create a new template using the Visual Builder, Plain Text Editor, or Code Editor, or select an existing template from your template library.
Continue to scheduling
After reviewing the email content and template design, click Next to proceed to the Scheduling step.
Preview before sending
Best practice
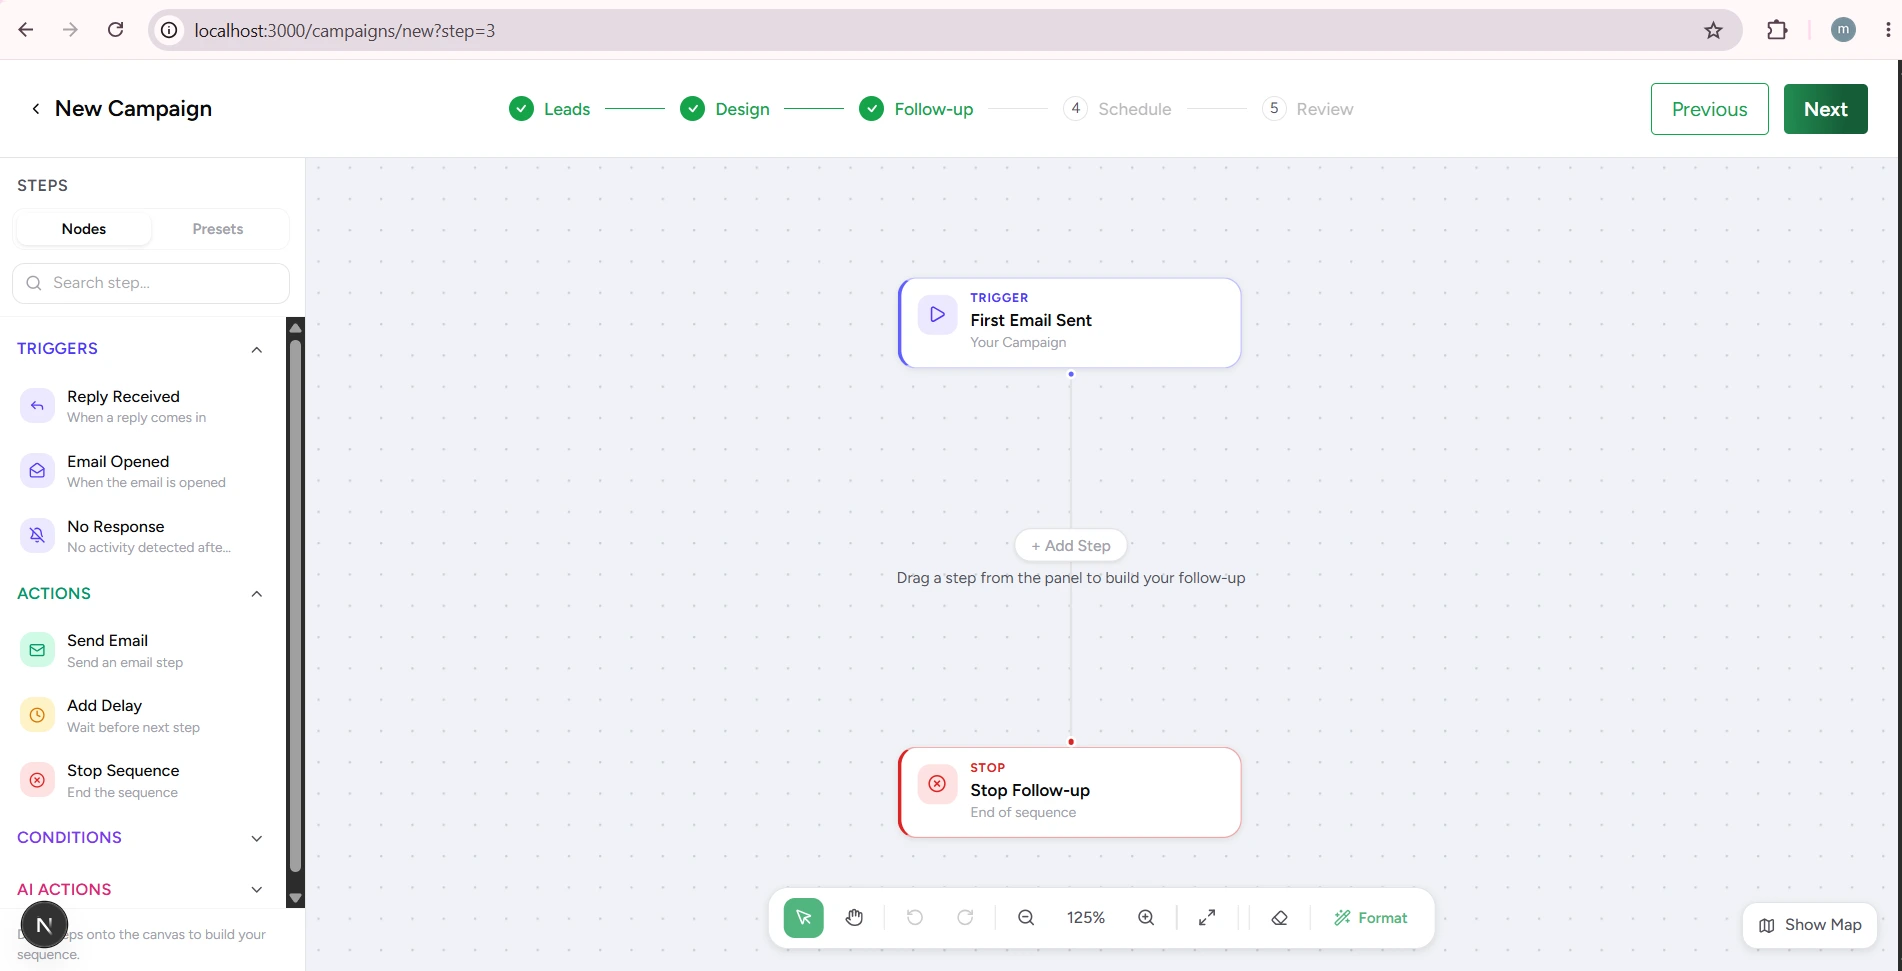
Follow-up Sequence Builder
Design automated follow-up journeys using an intuitive drag-and-drop workflow canvas. Build personalized engagement sequences without writing code.
Build automated follow-up journeys using drag-and-drop nodes, conditional branches, presets, and workflow controls.
Drag & Drop
Build workflows visually using interactive nodes.
Conditional Logic
Create Yes/No branches based on recipient behaviour.
Undo History
Restore previous states using Ctrl + Z.
Auto Formatting
Beautify workflows instantly.
Workflow Components
Triggers
- Initial campaign completion
- Email delivery events
- Recipient activity events
Actions
- Send follow-up emails
- Apply delays
- Update workflow data
- Execute follow-up operations
Conditions
- Email opened
- Email clicked
- Reply received
- Custom decision logic
Conditional nodes automatically create Yes and No branches to personalize recipient journeys.
AI Actions
- Generate dynamic content
- Personalize messaging
- Create contextual responses
Building a Follow-up Sequence
Canvas Controls
Preset Workflows
Pre-built templates help users quickly start common follow-up scenarios using proven workflow structures.
Loading a preset replaces the current workflow while preserving the previous version in undo history. Press Ctrl + Z to restore it.
Best Practices
- • Start with simple sequences.
- • Use conditions only when necessary.
- • Validate each branch before publishing.
- • Apply auto-formatting regularly.
- • Use presets to accelerate setup.
Next Step
After configuring the follow-up sequence, proceed to the Scheduling step to define when campaign emails and follow-up actions should be delivered.
Campaigns
Schedule Campaign Delivery
The Schedule step controls when your campaign becomes active and how emails are delivered. Choose a sending strategy that aligns with your outreach goals, audience size, and sender reputation requirements.
Configure campaign activation, delivery strategy, daily limits, and sending preferences before launch.
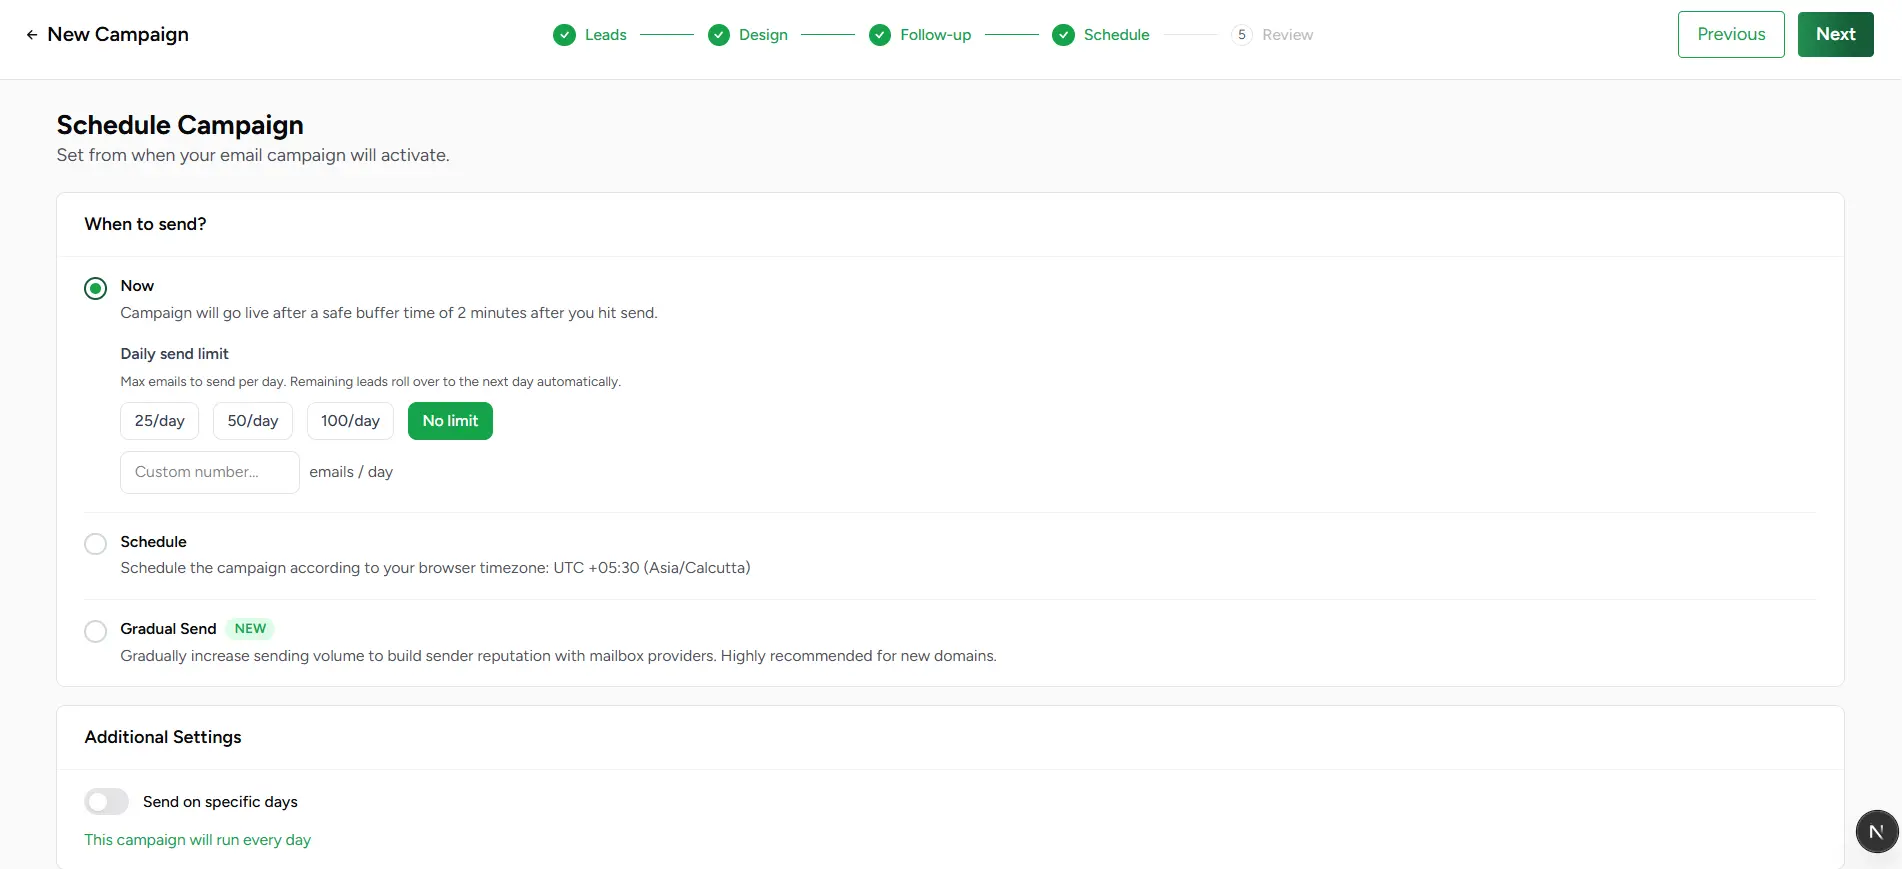
Choose a sending method
Select one of the available delivery methods for your campaign. Each option is designed for different outreach scenarios and only one sending method can be used per campaign.
Send Now
Launch the campaign immediately. Emails begin sending after a short safety buffer, and optional daily sending limits can be applied to control delivery volume.
Schedule
Choose a future start date and time based on your browser timezone. You can also optionally define an end date to automatically stop campaign delivery.
Gradual Sending
Start with a predefined daily volume and gradually increase sending over time. Configure growth increments and safety thresholds to build sender reputation and improve deliverability.
Additional Settings
Restrict campaign delivery to specific weekdays by selecting the days on which emails should be sent.
Continue to Review
After validating your scheduling preferences and delivery settings, click Next to proceed to the final review step.
Daily sending limits
Recommended sending strategy
Campaigns
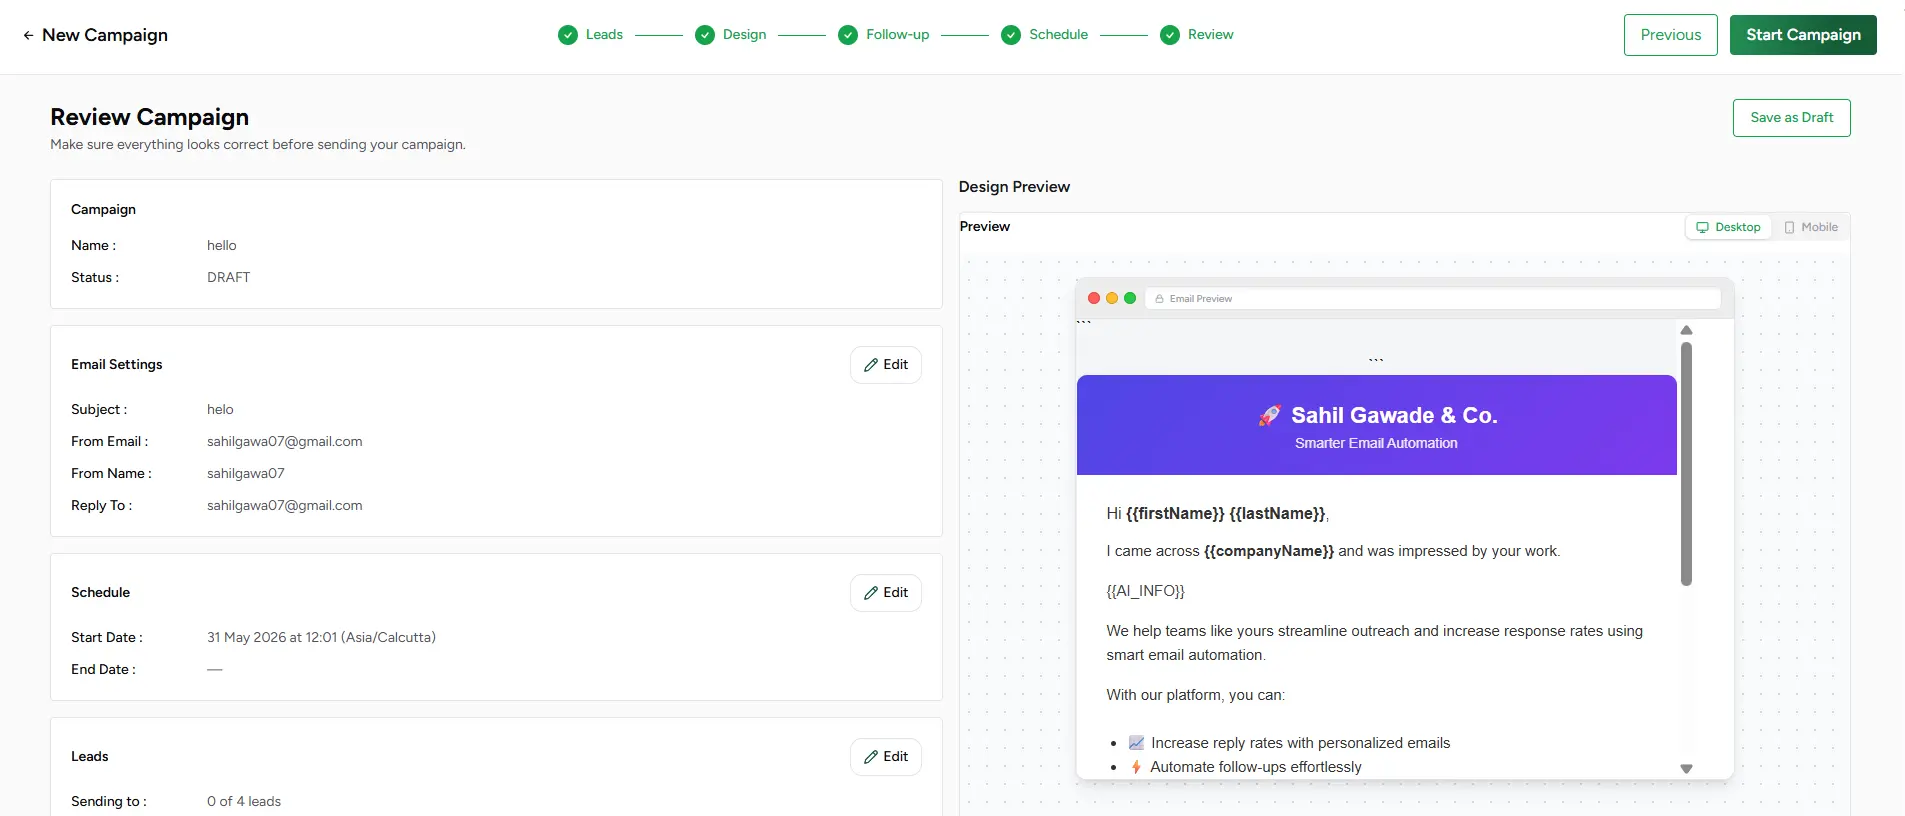
Review and Launch Campaign
The Review step provides a complete summary of your campaign configuration before launch. Verify campaign details, email settings, schedule, lead information, and email content to ensure everything is configured correctly.
Review campaign configuration, validate warnings, preview email content, and launch the campaign.
Review workflow
Review campaign details
Verify the campaign name and current status before launching or saving the campaign as a draft.
Validate email settings
Confirm the sender account, sender name, reply-to address, subject line, and email content configuration.
Check scheduling preferences
Review campaign start date, end date, delivery settings, and sending preferences.
Verify lead information
Confirm the total number of eligible leads and review any skipped contacts caused by missing or invalid data.
Start or save as draft
Start the campaign immediately or save it as a draft for future review and editing.
Email preview
Campaign warnings
Ready to launch
🎉 Campaign launched successfully
Your campaign is now active and emails will be delivered according to the configured schedule. Monitor delivery progress, engagement metrics, and campaign performance from the Dashboard and Campaigns pages.
Sending Accounts
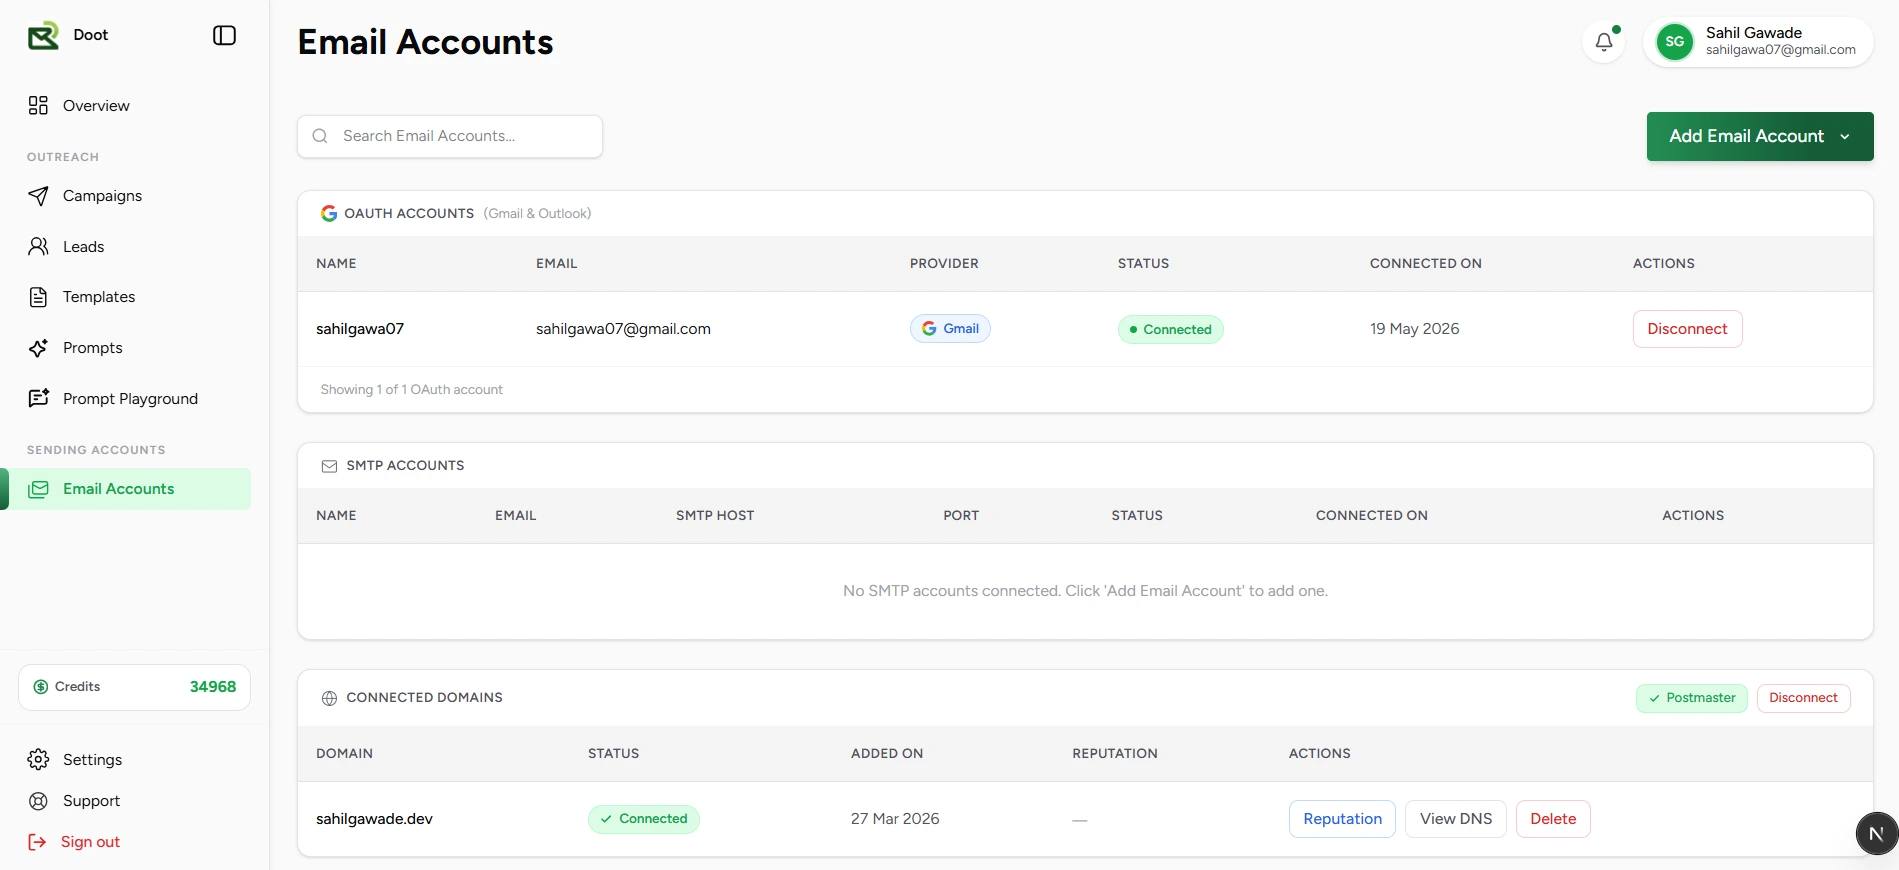
Understanding the Email Accounts
Email Accounts is the central location for configuring and managing all resources used to send campaign emails. Before a campaign can be launched, at least one sender account must be connected. Depending on your provider, you can connect Gmail, Outlook, SMTP mailboxes, and authenticated sending domains.
Manage OAuth mailboxes, SMTP senders, domain authentication, sender reputation, and account health from a single page.
| Field | What it means |
|---|---|
| OAuth Accounts | Connected Gmail and Outlook mailboxes used for campaign delivery. |
| SMTP Accounts | Custom mailboxes connected using SMTP credentials. |
| Connected Domains | Verified domains authenticated through DNS records. |
| Google Postmaster | Monitor Gmail sender reputation and spam rates. |
| Search | Quickly locate connected senders. |
| Add Email Account | Connect Gmail, Outlook, SMTP mailboxes, or domains. |
Required before sending
Sender health matters
Sending Accounts
Connect Gmail and Outlook mailboxes
OAuth connections allow Stynar to send emails using Gmail and Outlook without storing mailbox passwords. Authentication is handled securely through Google or Microsoft.
Open Add Email Account
Click Add Email Account in the upper-right corner of the page.
Choose Gmail or Outlook
Select the provider you want to connect.
Sign in and approve permissions
Authenticate with Google or Microsoft and approve all requested permissions.
Start sending
After successful authentication, the mailbox appears in the OAuth Accounts table.
| Field | What it means |
|---|---|
| Name | Mailbox display name. |
| Connected sender address. | |
| Provider | Gmail or Outlook. |
| Status | Current connection status. |
| Connected On | Date the account was connected. |
| Actions | Disconnect or reconnect the sender account. |
Connection statuses
- Connected – Account is ready to send emails.
- Disconnected – Authentication has expired or been revoked.
- Reconnect Required – User action is needed before sending can continue.
Approve all requested permissions
Sending Accounts
Set up and verify SMTP sending
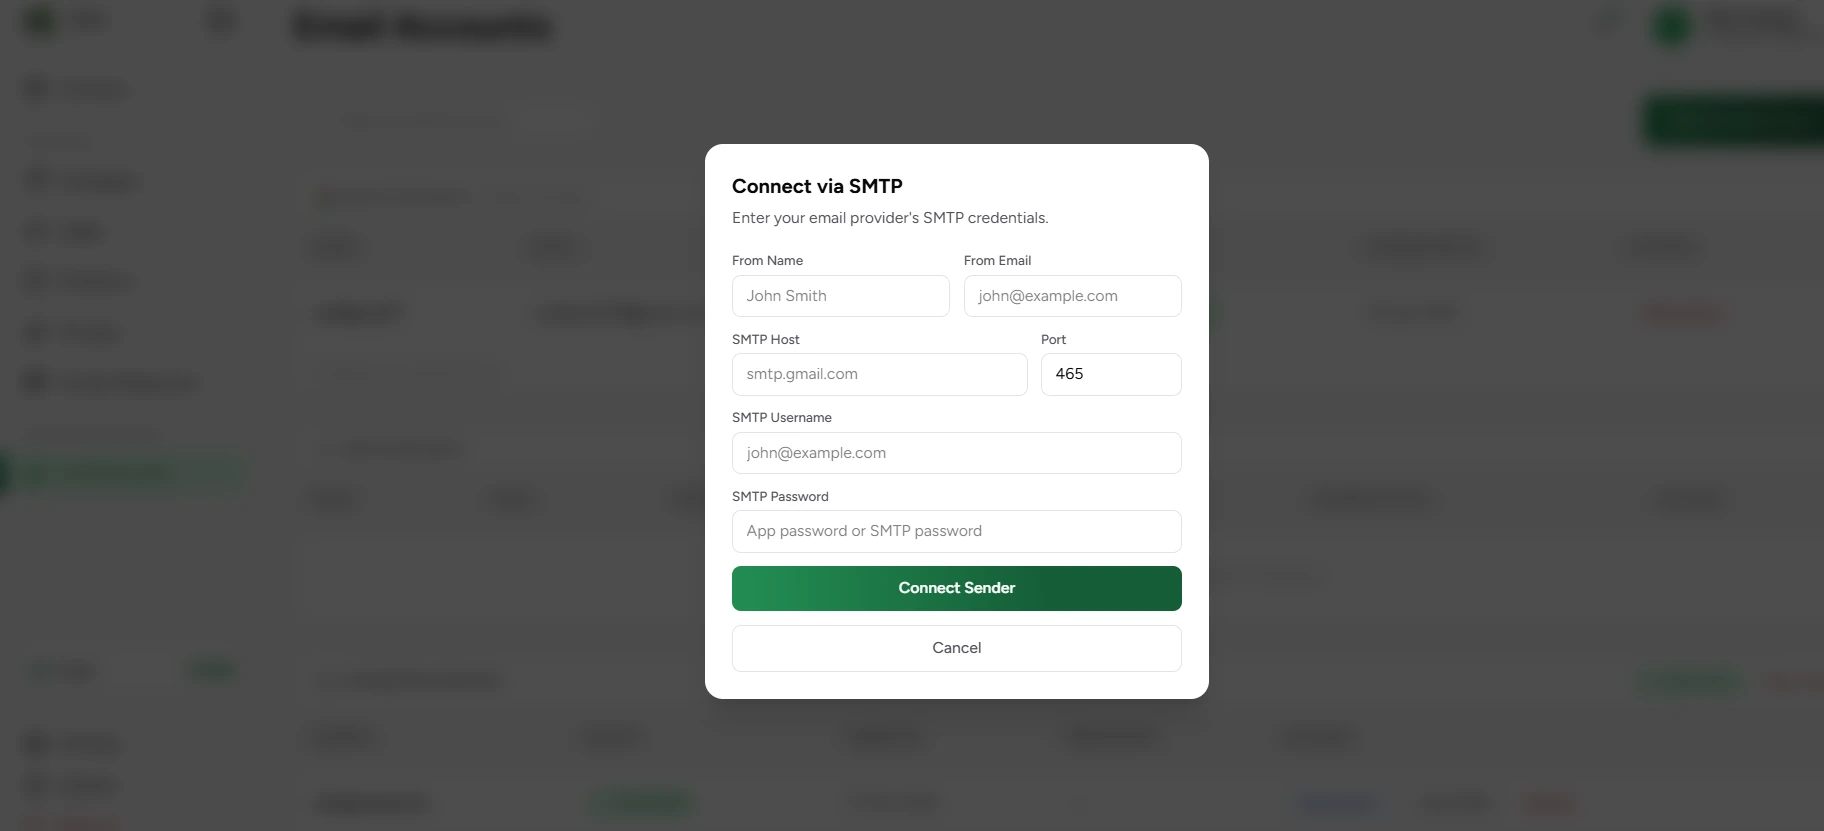
SMTP accounts allow Stynar to send emails through external mail providers. Use SMTP when Gmail or Outlook OAuth is unavailable or when using services such as Amazon SES, Zoho Mail, Mailgun, SendGrid, or private mail servers.
| Field | What it means |
|---|---|
| From Name | Display name recipients see in their inbox. |
| From Email | Sender email address. |
| SMTP Host | Provider SMTP server hostname. |
| Port | Common values are 465 (SSL) or 587 (STARTTLS). |
| SMTP Username | Mailbox username or email address. |
| SMTP Password | Password or app password required for authentication. |
Add SMTP Account
Enter sender identity and SMTP credentials.
Verify Connection
Test authentication and connectivity.
Re-verify
Verify again after updating credentials.
Send Campaigns
Use verified SMTP accounts for email delivery.
| Field | What it means |
|---|---|
| Verify | Tests SMTP connectivity and authentication. |
| Edit | Update sender information or credentials. |
| Disconnect | Remove the SMTP account from Stynar. |
| Status | Shows current verification state. |
SMTP verification statuses
- Not Verified – Verification has not been run.
- Testing – Verification is currently running.
- Connected – SMTP connection succeeded.
- Failed – Connection or authentication failed.
Verify before launching campaigns
Common SMTP providers
Manage SMTP senders, monitor verification status, update credentials, and disconnect accounts.
Sending Accounts
Set up and verify sending domain
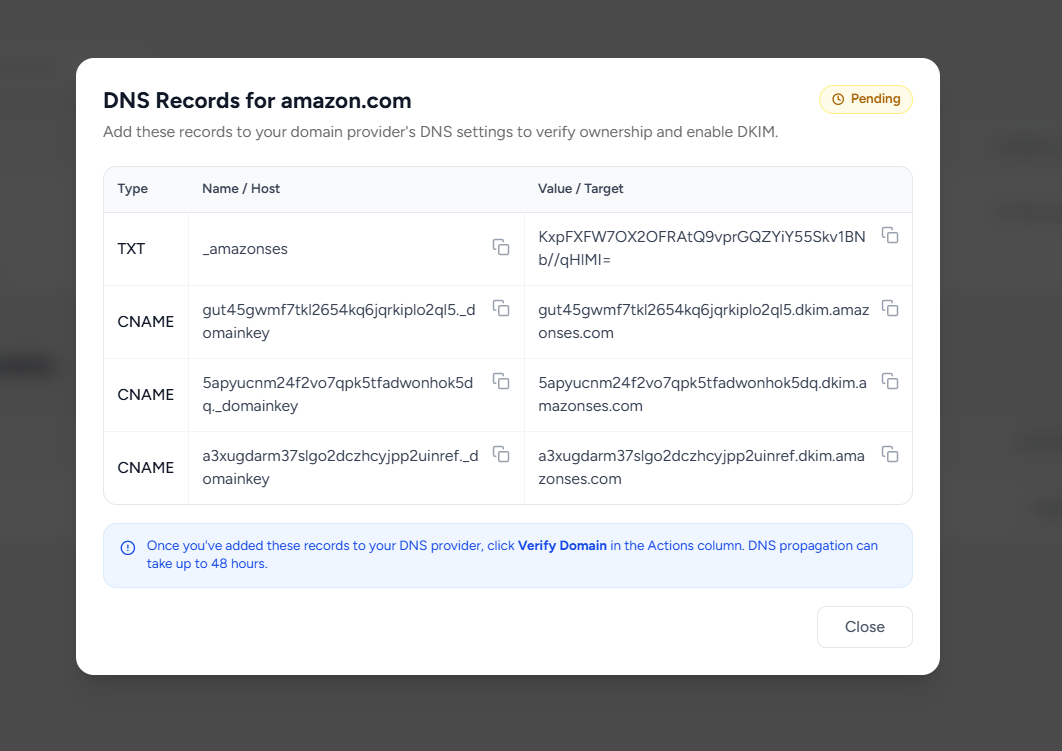
Domain authentication verifies ownership of your domain and improves email deliverability. Stynar generates DNS records that must be added to your DNS provider before the domain can be used for authenticated email sending.
Add Domain
Enter the domain you want to use for sending.
Copy DNS Records
Copy the generated DNS values from Stynar.
Update DNS Provider
Add the records in Cloudflare, GoDaddy, Route53, Namecheap, or another provider.
Verify Domain
Return to Stynar and complete verification.
| Field | What it means |
|---|---|
| Domain | Verified sending domain. |
| Status | Current verification state. |
| Added On | Date the domain was added. |
| Reputation | Google Postmaster reputation metrics. |
| View DNS | Display DNS records used for verification. |
| Delete | Remove the domain from Stynar. |
| Postmaster | Connect Google Postmaster Tools. |
| Record type | Purpose | Why it matters |
|---|---|---|
| TXT | SPF | Authorizes approved mail servers for your domain. |
| TXT/CNAME | DKIM | Adds cryptographic signing for outgoing messages. |
| TXT | DMARC | Defines what receivers should do when authentication fails. |
Domain statuses
- Pending – Waiting for DNS verification.
- Connected – Domain verified successfully.
- Verification Failed – DNS records are missing or incorrect.
DNS propagation
Why domain verification matters
View DNS records, verification status, copy actions, and troubleshooting guidance.
Sending Accounts
Google Postmaster monitoring
After a domain is verified, connect Google Postmaster Tools to monitor Gmail-specific deliverability and reputation metrics.
| Field | What it means |
|---|---|
| Domain Reputation | Overall trust score assigned by Gmail. |
| Spam Rate | Percentage of emails marked as spam. |
| DKIM | Authentication success rate. |
| SPF | Sender validation status. |
| DMARC | Alignment and policy status. |
Reputation data availability
Monitor reputation regularly
Sending Accounts
Protect sender reputation and inbox placement
Deliverability depends on sender trust, DNS authentication, sending volume, list quality, recipient engagement, and domain reputation. Stynar provides tools to help maintain healthy sending behavior.
Recommended production setup
- Connect a Gmail or Outlook mailbox.
- Add and verify a custom sending domain.
- Complete DNS authentication.
- Connect Google Postmaster Tools.
- Warm up new senders gradually.
- Monitor reputation and spam rates regularly.
- Reconnect disconnected accounts immediately.
- Review campaign failures and pause reasons.
- Use clean lead lists and remove invalid contacts.
- Avoid large-volume sends from new mailboxes.
Best deliverability setup
Audience
Manage contacts from the Leads page
The Leads page centralizes contacts across campaigns. You can search, filter by status, campaign, and group, sort by column or date, open lead details, apply bulk labels, export, import, and delete contacts. Leads load automatically as you scroll.
Search, filters, campaign grouping, labels, bulk selection, lead detail drawers, and import actions are available from one place.
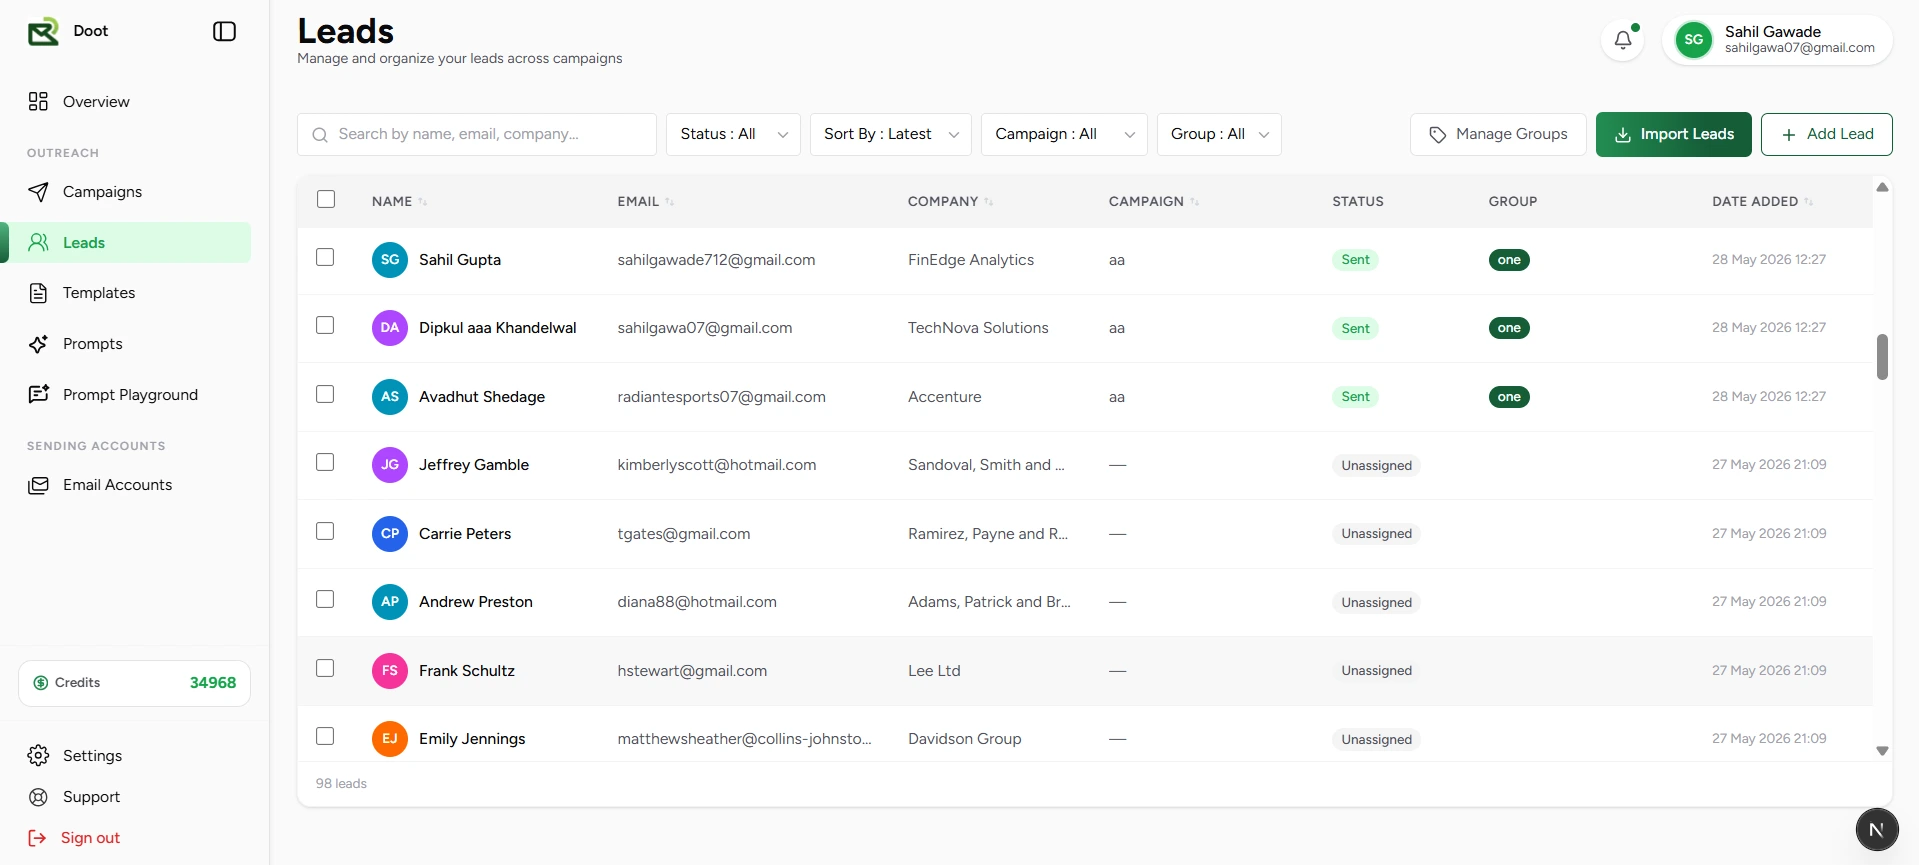
Search
Search by name, email, company, campaign name, or label.
Filters
Filter by lead status, campaign, group, and latest or oldest order.
Groups
Apply group labels in bulk, rename groups, and remove group labels from contacts.
Lead drawer
Inspect and edit individual lead fields from a slide-out detail view.
Add lead
Manually add a contact with name, email, phone, company, and custom fields using the Add Lead sidebar.
Import leads
Upload a CSV file to import multiple contacts at once. Map CSV columns to lead fields before importing.
Export leads
Select one or more leads and export them as a CSV file for use in external tools.
Bulk delete
Select multiple leads and delete them at once with a confirmation prompt to prevent accidental removal.
Column sorting
Click any column header to sort leads by name, email, company, campaign, or date added.
Keyboard shortcut
Infinite scrolling
Plan limits
Audience
Import CSV contacts and map variables
CSV import supports campaign-specific lead uploads and global lead imports. During campaign creation, imports move through upload, variable mapping, and review steps before the campaign can proceed. You can also add leads manually, edit them inline, and add custom columns during review.
email,firstName,lastName,company,website,linkedIn
maya@northstar.io,Maya,Rao,Northstar,https://northstar.io,https://linkedin.com/in/mayaUpload the CSV
Use a file with an email column and any additional personalization columns you need. Email and First Name are required fields.
Map columns
Match CSV headers to standard fields (firstName, lastName, email, company) or custom variables used in templates. Columns marked 'skip' are ignored.
Review leads
Confirm the imported rows, fix missing values inline, add custom columns, or add individual leads manually before uploading.
Upload and continue
Valid leads are uploaded to the campaign. Invalid leads (missing email or first name) can be fixed or skipped before proceeding to email setup.
Required fields block upload
Optional fields and personalization gaps
Duplicate emails are auto-skipped
Edit leads inline during review
CSV upload
Upload any CSV file. Email and first name columns are required. All other columns are optional.
Column mapping
Map CSV headers to lead fields or mark them as skip. Custom column names are preserved as template variables.
Inline editing
Edit any lead field directly in the review table using keyboard navigation (Tab and Enter).
Add leads manually
Add individual leads during the review step without uploading a new CSV.
Add custom columns
Add new data columns to all leads during review, then fill in values before uploading.
Validation banners
Red banners block upload for missing required fields. Yellow banners warn about incomplete optional data.
Audience
Use groups and filters for segmentation
Groups are labels applied to leads for segmentation, filtering, and bulk operations. A lead can belong to multiple groups. Groups work across both campaign-assigned leads and unassigned contacts. Lead counts per group are shown in the filter dropdown.
Select leads
Check one or more leads in the table. The bulk action bar appears at the bottom of the screen.
Apply a group label
Click the Groups button in the bulk action bar, type a group name and pick a color, then confirm. The label is applied instantly to all selected leads.
Filter by group
Use the Group filter dropdown to view only leads in a specific group. The dropdown shows each group name and its lead count.
Manage groups
Click Manage Groups (visible once at least one group exists) to rename or delete groups. Renaming or deleting a group updates all leads in that group at once.
Useful group patterns
- Group by source — Webinar, LinkedIn, Referral, or Import batch.
- Group by audience — SaaS Founders, Agencies, Recruiters, or Investors.
- Group by follow-up state after a campaign review.
- Export selected groups when you need an offline backup or analysis.
- Use groups to pre-segment contacts before starting a new campaign.
- Apply multiple groups to the same lead for cross-filtering.
Renaming and deleting affects all leads
Leads can belong to multiple groups
Apply in bulk
Select multiple leads and apply a group label to all of them at once from the bulk action bar.
Filter by group
Use the Group dropdown to filter the leads table. Each group shows its lead count in brackets.
Rename groups
Open Manage Groups to rename a label. The new name is applied to every lead in that group immediately.
Delete groups
Remove a group label from all leads at once. The leads are kept — only the label is removed.
Export by group
Filter by group, select all visible leads, then export as CSV for offline use or analysis.
Instant updates
Group labels appear immediately on leads. If a sync error occurs, a notification will prompt you to refresh.
Templates
Understanding the Email Templates
The Templates page serves as a centralized workspace for creating, organizing, and managing reusable email templates. Templates help standardize email content, reduce repetitive work, and accelerate campaign creation. Users can create templates using the Visual Builder, Plain Text Editor, Code Editor, or AI-powered content generation tools.
Browse templates, search content, filter by category, save public templates, and manage your own reusable email templates.
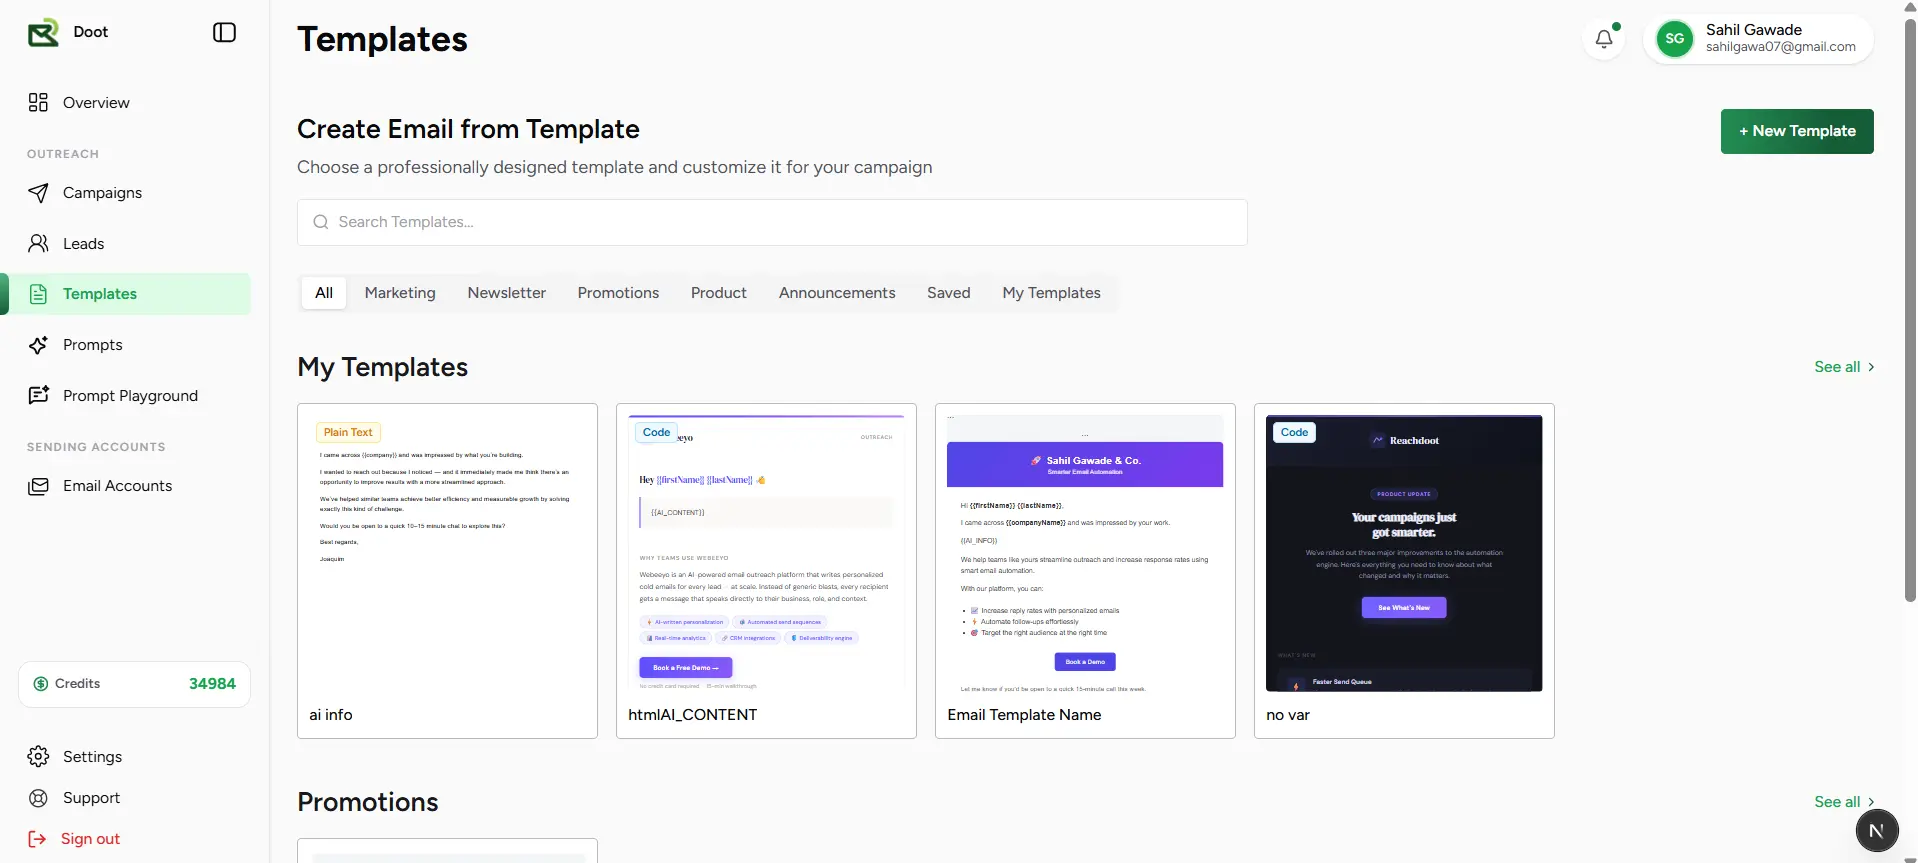
Search Templates
Quickly locate templates by searching template names and available content within the template library.
Category-Based Organization
Templates are organized into categories such as Marketing, Newsletter, Promotions, Product, and Announcements for easier discovery.
Saved Templates
Save public templates to your personal collection for quick access and future campaign use.
My Templates
Create and manage your own custom templates tailored to specific outreach requirements and business goals.
Generate with AI
Create email templates using AI-powered content generation to quickly build personalized and campaign-ready emails.
Template Preview
Preview template designs before using them in campaigns to verify content, layout, and formatting.
Campaign Integration
Templates can be selected directly during campaign creation to streamline email setup and content management.
Available Template Categories
| Field | What it means |
|---|---|
| Marketing | Templates designed for lead generation, outreach, and customer engagement campaigns. |
| Newsletter | Templates used for recurring updates, newsletters, and audience communications. |
| Promotions | Templates focused on offers, discounts, special events, and promotional campaigns. |
| Product | Templates for product launches, feature announcements, and product updates. |
| Announcements | Templates intended for company news, updates, and important notifications. |
| Saved | Templates saved from the public template library for future use. |
| My Templates | Custom templates created and managed within your workspace. |
Why use templates?
Templates
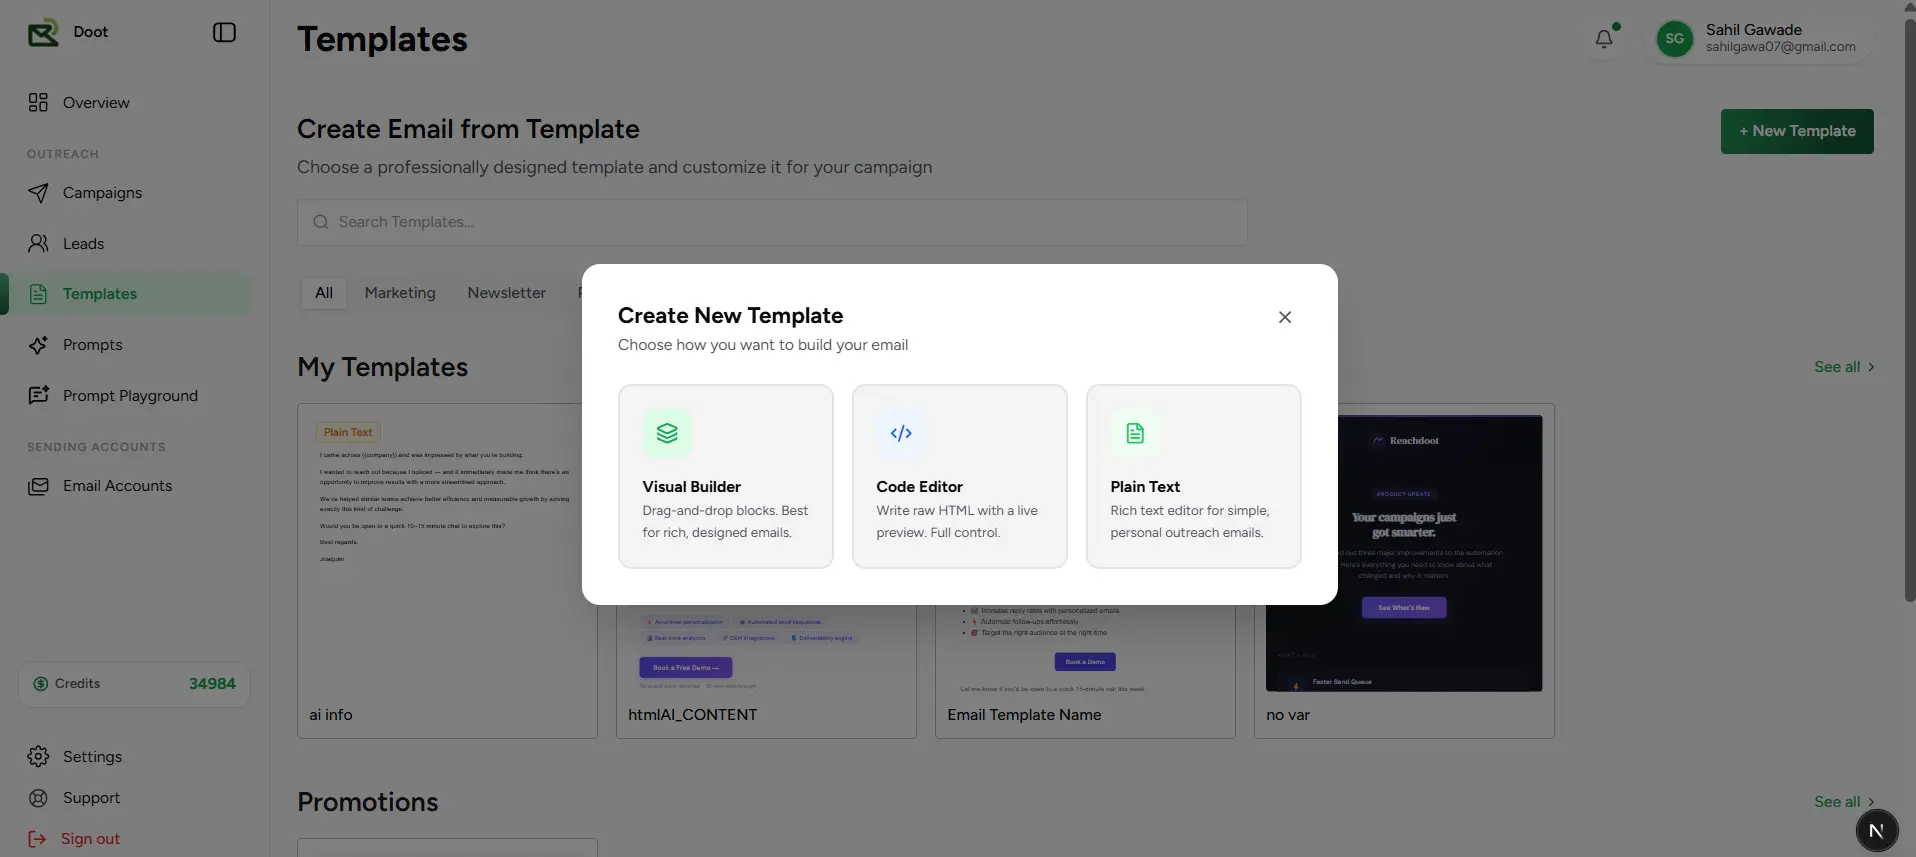
Create a New Template
Creating a template allows you to build reusable email content that can be used across multiple campaigns. Templates can be created manually using different editors or generated with AI to accelerate content creation and maintain consistent messaging.
Create a new template, provide basic information, and choose the editor that best matches your email design requirements.
Template creation workflow
Navigate to Templates
Open the Templates page from the main navigation menu to access and manage your email templates.
Create a template
Click the Create Template button to start creating a new reusable email template.
Choose an editor
Select the editor that best fits your needs: Visual Builder, Plain Text Editor, or Code Editor.
Enter template details
Provide a template name and any required information to help identify the template later.
Start designing
Begin creating your email content using the selected editor and save the template when complete.
Visual Builder
Create professional email layouts using drag-and-drop components without writing code.
Plain Text Editor
Build simple text-based emails focused on direct communication and deliverability.
Code Editor
Design fully customized email templates using HTML and advanced styling.
Choose the right editor
AI-assisted content creation
Templates
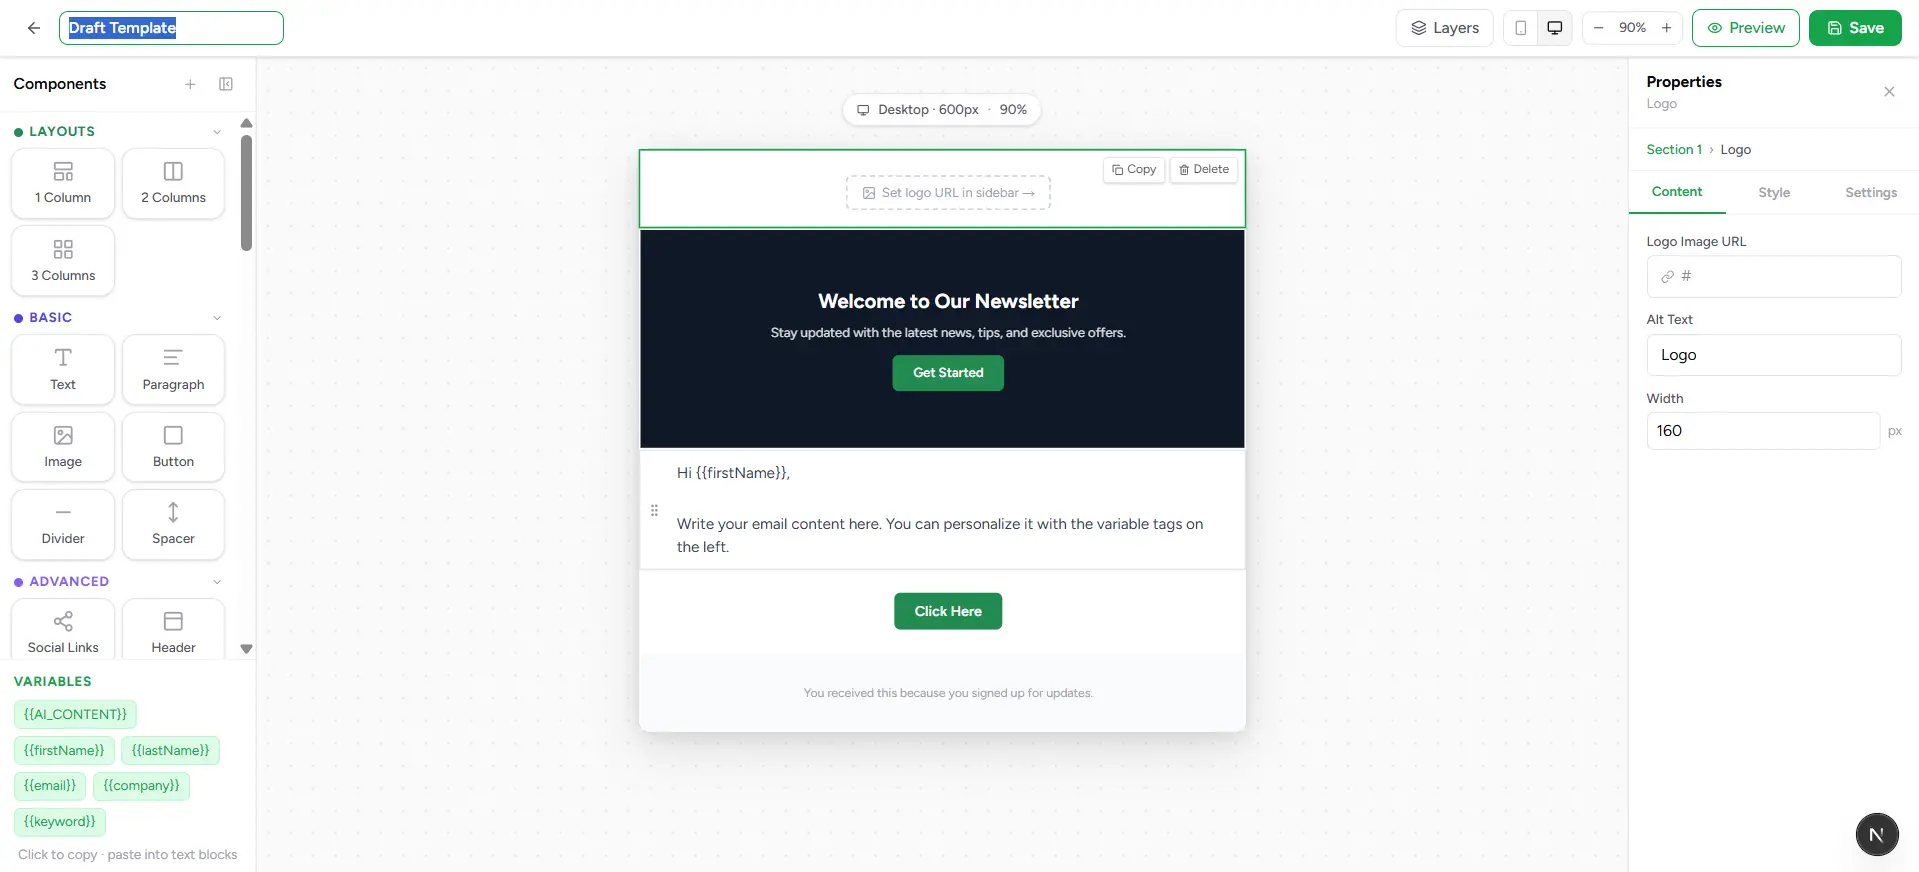
Visual Template Builder
The Visual Builder allows you to design professional email templates using a drag-and-drop interface. It eliminates the need for coding by providing a structured layout with prebuilt components, real-time preview, and property-based customization.
The editor is divided into three main sections: components panel, central canvas, and properties panel for fine-grained customization.
How the Visual Builder works
Open Visual Builder
Select Visual Builder when creating a new template to launch the drag-and-drop editor.
Drag components
Use the left sidebar to drag layouts, text, images, buttons, and other elements into the canvas.
Customize content
Click any component to edit its content, styling, and configuration using the properties panel on the right.
Use variables
Insert dynamic variables like {{firstName}} or {{email}} to personalize your email content.
Preview & save
Preview the final email design in real-time and save the template for reuse in campaigns.
Components Panel
Contains layouts, basic elements, advanced blocks, and variables used to build email content.
Canvas
The central workspace where you assemble and visually design your email template.
Properties Panel
Used to configure selected elements such as styling, content, spacing, and links.
Drag-and-drop flexibility
Real-time preview
Templates
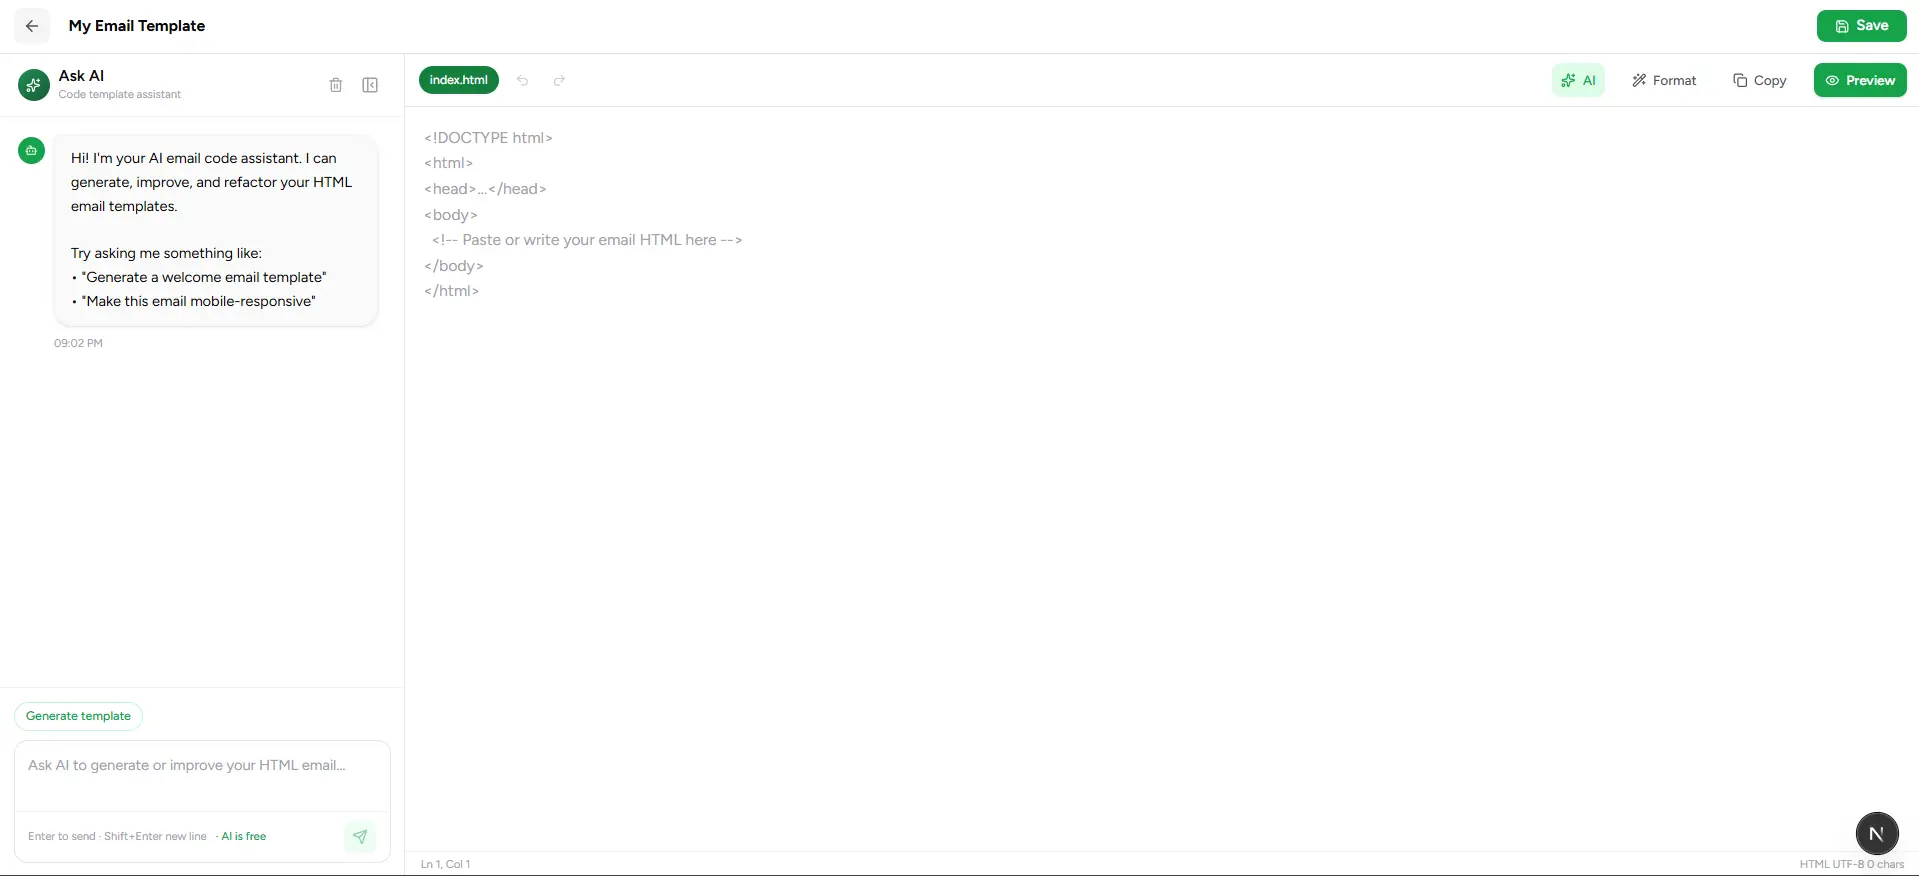
Code Template Editor
The Code Editor provides a developer-friendly environment to create email templates using raw HTML. It includes a built-in AI assistant, syntax-ready editor, and quick actions like format, copy, and live preview to streamline email development.
The editor is split into three sections: AI assistant panel on the left, HTML code editor in the center, and quick action controls for formatting, previewing, and saving.
How the Code Editor works
Open Code Editor
Select Code Editor when creating a template to start writing or pasting HTML email code.
Write or paste HTML
Use the central editor to build your email structure using standard HTML and inline styles.
Use AI assistant
Ask the AI panel to generate, improve, or refactor your email template code instantly.
Format & refine
Use the Format option to auto-align and clean your HTML for better readability.
Preview & save
Preview the rendered email in real time and save the template for reuse in campaigns.
AI Assistant Panel
Helps generate and improve HTML email templates using natural language prompts.
Code Editor
Central workspace for writing, editing, and structuring raw HTML email templates.
Action Toolbar
Provides quick actions like AI assist, format code, copy HTML, preview, and save template.
Developer-friendly editing
Faster template creation
Templates
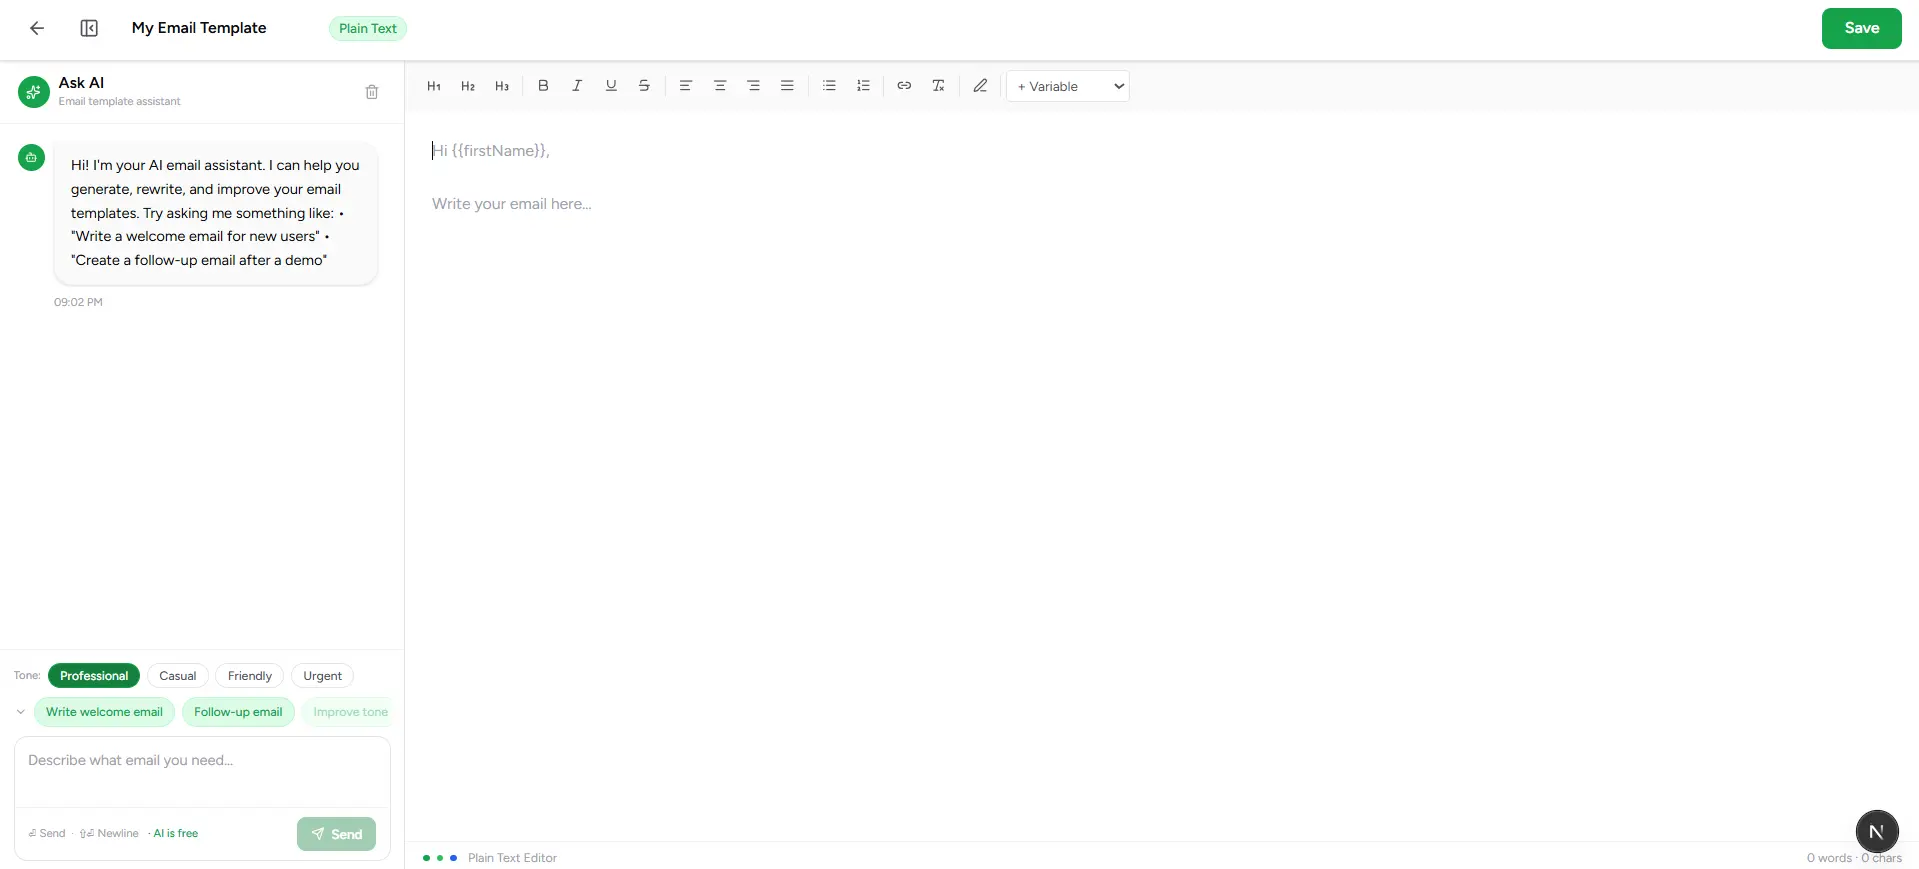
Plain Text Email Editor
The Plain Text Editor provides a simplified and distraction-free way to create email content using rich-text formatting. It is ideal for quick communication, follow-ups, and personalized emails with built-in AI assistance, tone controls, and variable support.
The editor includes an AI assistant panel on the left, a rich text editing area in the center with formatting toolbar, and tone-based writing controls with quick AI prompts.
How the Plain Text Editor works
Open Plain Text Editor
Select Plain Text Editor when creating a template for quick, text-based email composition.
Write your email
Use the central editor to write emails with basic formatting like headings, bold, lists, and links.
Use variables
Insert dynamic variables like {{firstName}} to personalize emails for each recipient.
Choose tone
Select tone options such as Professional, Casual, Friendly, or Urgent to adjust the writing style.
Use AI assistance
Leverage AI prompts like welcome emails, follow-ups, or tone improvement to quickly generate content.
AI Assistant Panel
Helps generate, rewrite, and improve email content using smart AI prompts.
Plain Text Editor
A rich text editor supporting formatting tools like headings, bold, lists, and variables.
Tone & Quick Actions
Allows switching writing tone and using predefined AI actions like welcome or follow-up emails.
Key Features
Rich text formatting
Supports headings, bold, italic, alignment, lists, and links for structured email writing.
AI-powered writing
Generate emails instantly or improve existing content using AI suggestions.
Tone control
Switch between Professional, Casual, Friendly, and Urgent tones to match communication style.
Quick templates
Use built-in prompts like welcome emails, follow-ups, or improvement suggestions.
Variable support
Personalize emails using dynamic placeholders like {{firstName}}, {{email}}, etc.
Simple but powerful
Best for quick communication
Prompts
Manage AI Prompts
The Prompts page serves as a centralized workspace for creating, organizing, and managing reusable AI prompts. Prompts provide structured instructions that guide AI-generated email content, helping maintain consistent messaging, improve personalization, and reduce the time required to create campaign content. Saved prompts can be reused across multiple templates and tested using the Prompt Playground before being used in campaigns.
Create, search, and manage reusable prompts that can be used to generate personalized email content.
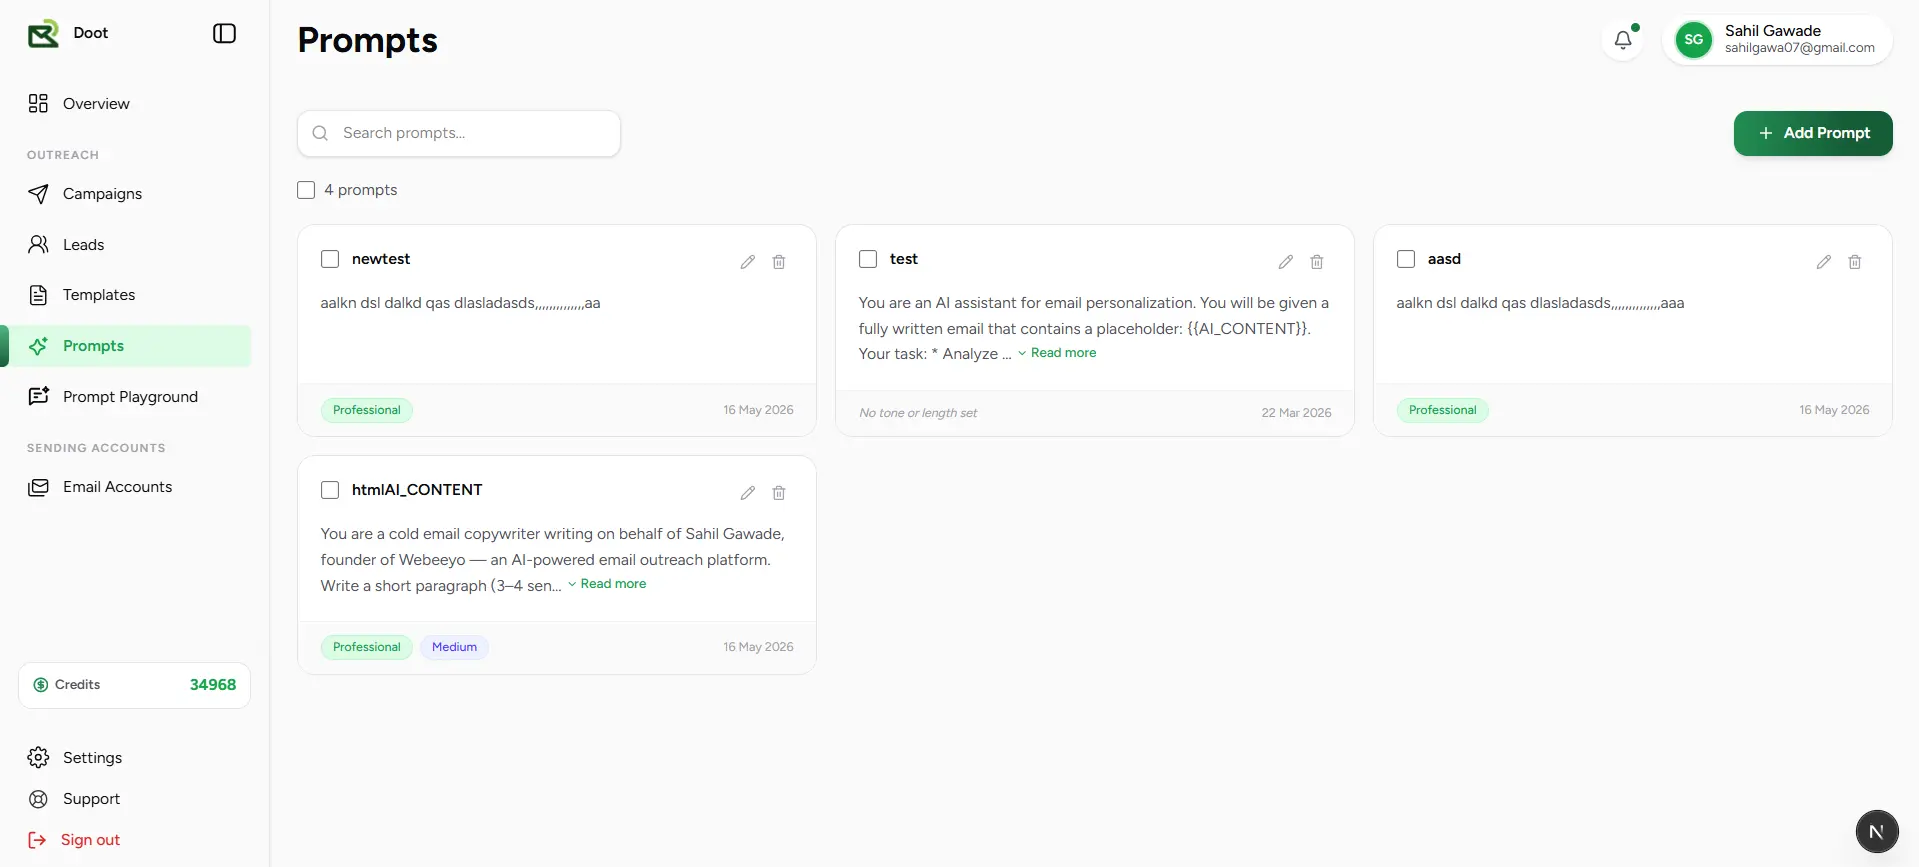
Create Prompts
Build reusable prompts that define how AI should generate email content.
Search Prompts
Quickly locate saved prompts using the built-in search functionality.
Reusable Instructions
Store commonly used instructions to maintain consistency across generated emails.
AI Content Generation
Use prompts to guide AI in creating personalized and context-aware email content.
Tone Control
Define the preferred communication style such as Professional, Friendly, or Formal.
Length Preferences
Configure whether generated content should be short, medium, or long.
How prompts work
Create a prompt
Define instructions that describe the purpose, structure, and desired outcome of AI-generated content.
Configure preferences
Optionally select a preferred tone and content length to guide AI output.
Save the prompt
Store the prompt in the library for future use and reuse across different workflows.
Use in Prompt Playground
Test prompts with templates and sample variables to preview generated content.
Generate emails
Apply prompts during email generation to create personalized content at scale.
Reusable AI instructions
Prompts
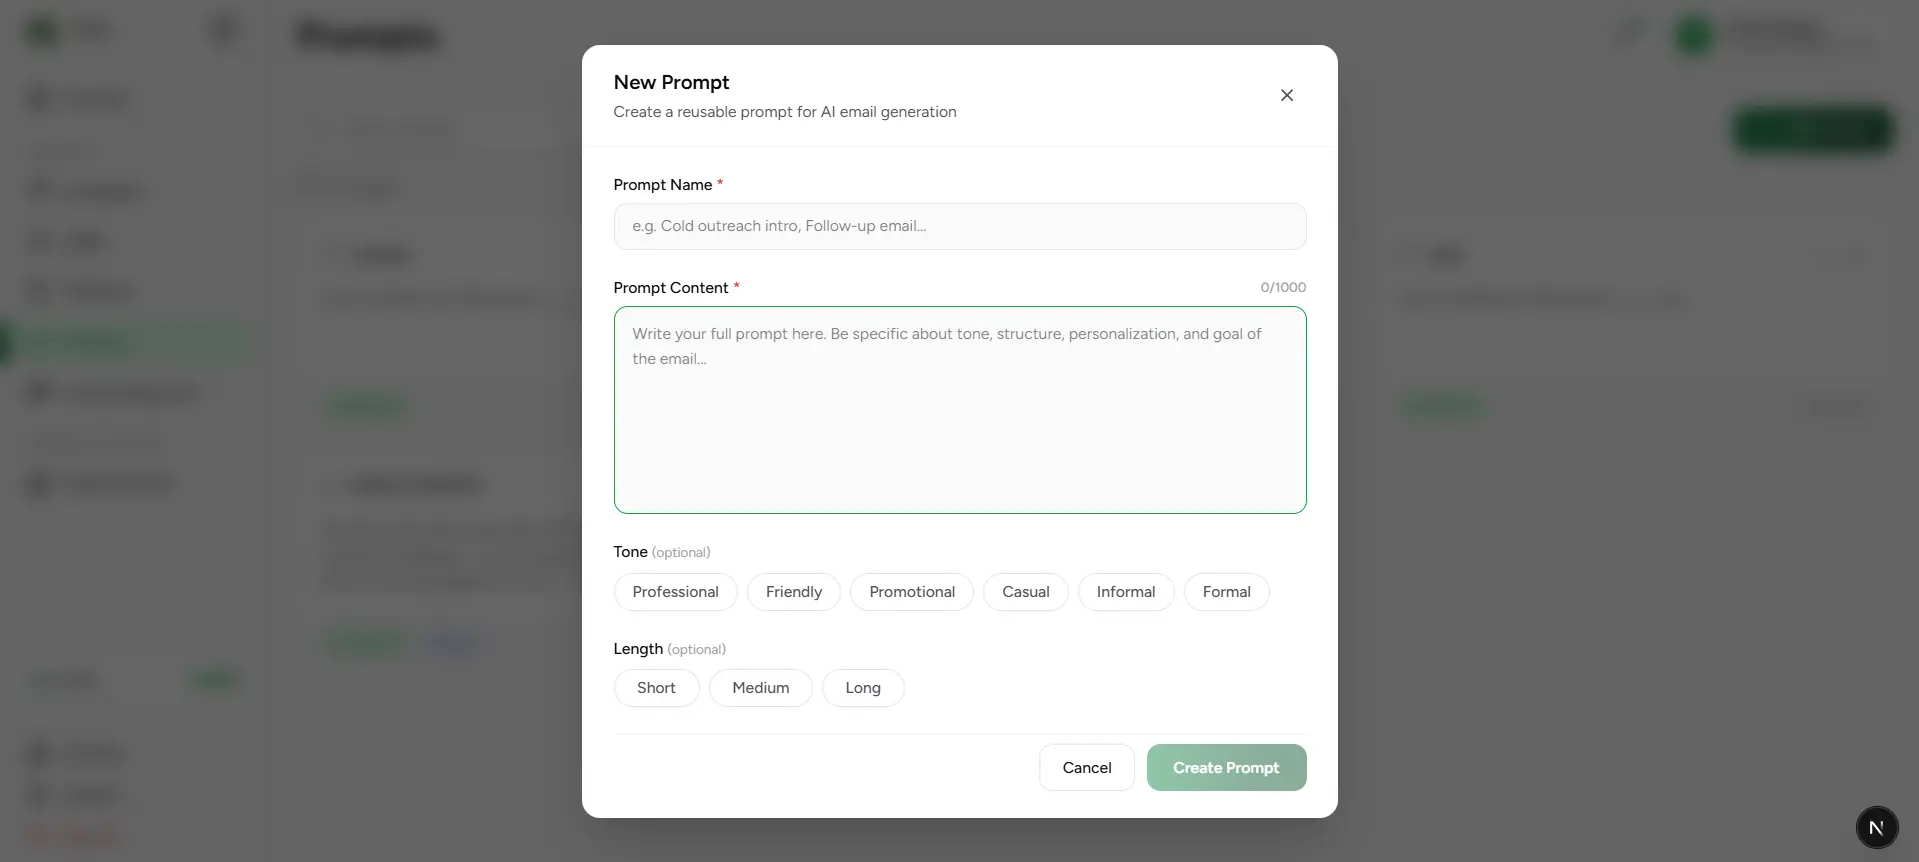
Create a Prompt
Creating a prompt allows you to define reusable instructions that guide AI-generated email content. Prompts help standardize messaging, maintain consistent communication styles, and reduce the time required to generate personalized emails across campaigns.
Create a reusable prompt by defining instructions, tone preferences, and content length settings.
Prompt creation workflow
Open Prompts
Navigate to the Prompts page from the main navigation menu.
Add Prompt
Click the Add Prompt button to open the prompt creation dialog.
Enter a name
Provide a descriptive name that helps identify the prompt later.
Write prompt content
Define the instructions, structure, goals, and personalization guidance that AI should follow.
Configure options
Optionally select tone and length preferences to influence generated content.
Save Prompt
Save the prompt to make it available in the prompt library and Prompt Playground.
Prompt Configuration Fields
| Field | What it means |
|---|---|
| Prompt Name | A unique and descriptive name used to identify the prompt. |
| Prompt Content | The instructions provided to AI, including tone, structure, personalization requirements, and content goals. |
| Tone | Optional writing style preference such as Professional, Friendly, Promotional, Casual, Informal, or Formal. |
| Length | Optional content length setting including Short, Medium, or Long. |
Custom Instructions
Define detailed instructions that guide how AI generates content.
Tone Selection
Control the communication style of generated emails.
Length Control
Specify the desired length of generated content.
Reusable Prompts
Save prompts for future use across templates and campaigns.
Write clear instructions
Save and reuse
Prompts
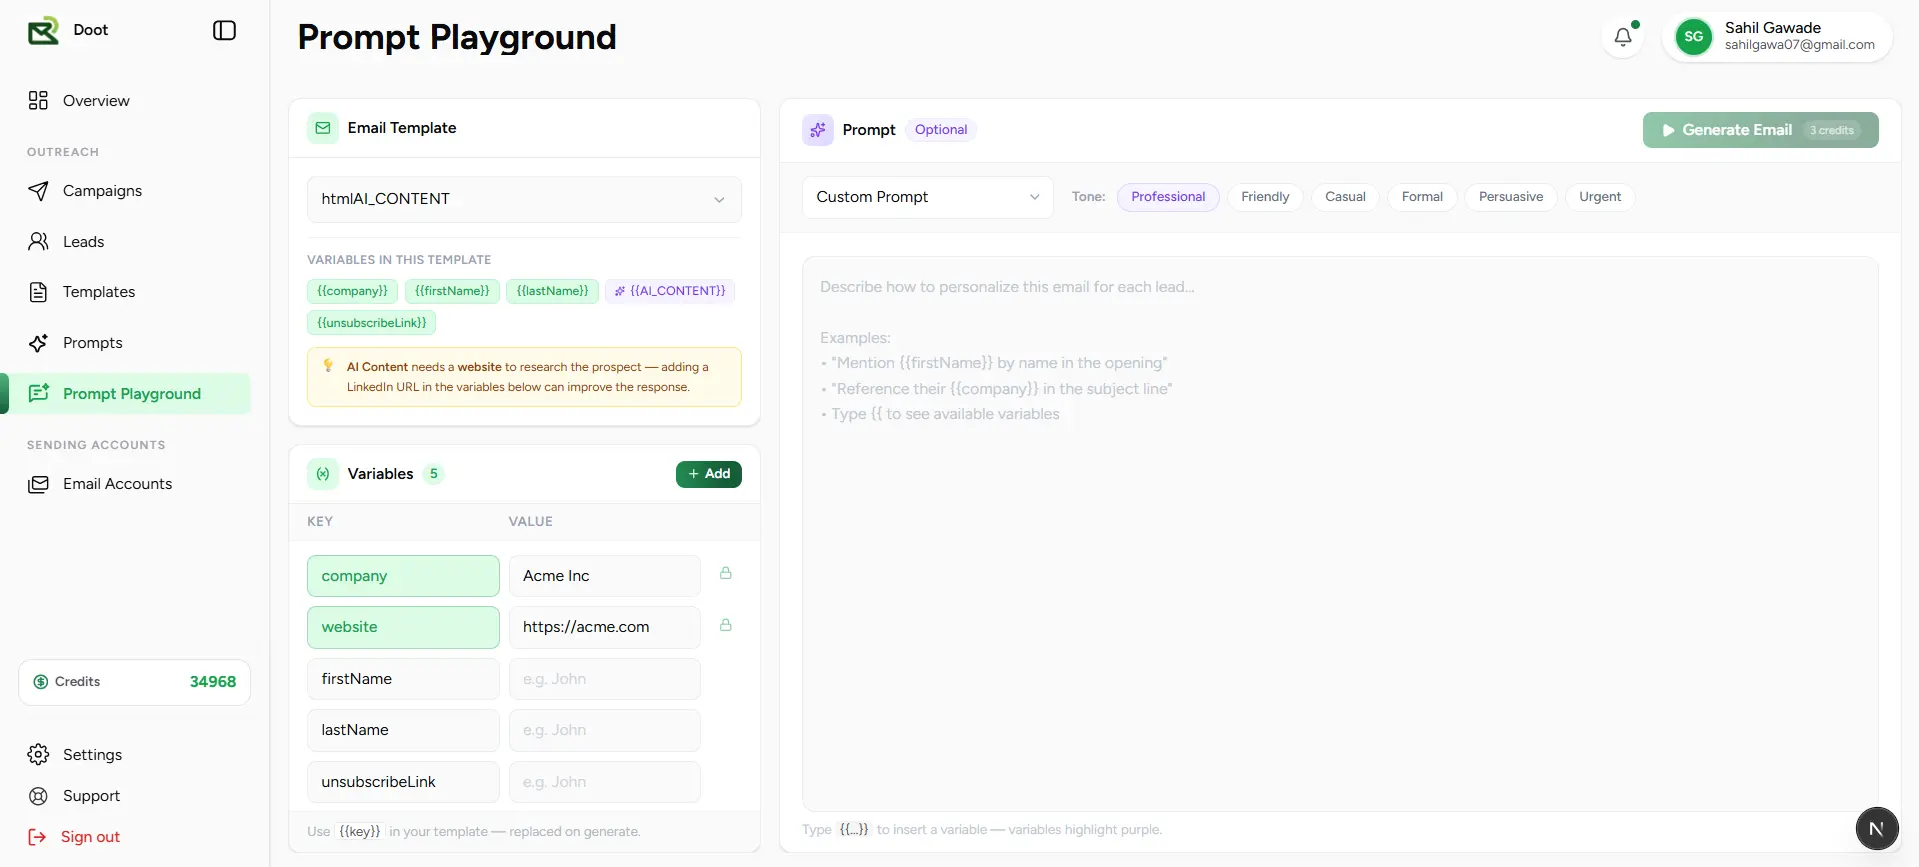
Prompt Playground
Prompt Playground provides an interactive environment for testing prompts, templates, and personalization variables before using them in campaigns. Users can select a saved template, choose a reusable prompt, provide sample variable values, and generate a preview of AI-powered email content. This helps validate prompts and ensure generated emails meet quality and personalization requirements.
Select a template, choose a prompt, configure variables, and generate a personalized email preview using AI.
How Prompt Playground works
Select an email template
Choose a saved email template that contains the structure and variables used for email generation.
Review available variables
View variables detected within the selected template and understand what data is required.
Choose a prompt
Select a saved prompt that provides instructions for AI-generated content.
Configure tone
Choose a communication style such as Professional, Friendly, Casual, Formal, Persuasive, or Urgent.
Provide variable values
Enter sample values for variables like name, company, website, industry, or job title.
Generate email
Generate and preview personalized email content using the selected template and prompt.
Playground Components
Template Panel
Select an email template and review variables available within that template.
Prompt Editor
Choose a saved prompt and review the instructions used for AI content generation.
Variables Panel
Provide sample values that replace personalization variables during generation.
Email Template Selection
Choose a saved email template that defines the email layout and supported variables.
Template Variables
View all variables used in the selected template and identify required personalization fields.
Saved Prompt Selection
Select reusable prompts from the prompt library for testing and previewing.
AI Email Generation
Generate personalized content using prompts, templates, and variable data.
Tone Control
Experiment with different communication styles before using generated content.
Live Preview
Review generated content before applying it to campaigns.
Available Tone Options
| Field | What it means |
|---|---|
| Professional | Formal and business-focused communication suitable for outreach and sales emails. |
| Friendly | Warm and approachable messaging that encourages engagement. |
| Casual | Relaxed and conversational communication style. |
| Formal | Structured and professional language with a polished tone. |
| Persuasive | Focused on encouraging action and highlighting value propositions. |
| Urgent | Creates a sense of importance and encourages timely responses. |
Variable Testing
The Variables panel allows you to simulate real recipient data before generating emails. Sample values can be provided for fields such as first name, last name, company name, website, industry, job title, LinkedIn profile information, and other custom variables used within templates and prompts.
Test before sending
Preview real-world results
Analytics & Admin
Campaign Analytics
Campaign Analytics provides a detailed view of campaign performance, delivery activity, audience engagement, and configuration details. Access this page by selecting a campaign from the Campaigns table. Use the analytics dashboard to monitor email delivery, track opens, review campaign settings, inspect sender health, and analyze recipient-level activity throughout the campaign lifecycle.
Monitor campaign performance, audience engagement, email delivery statistics, and campaign configuration from a single dashboard.
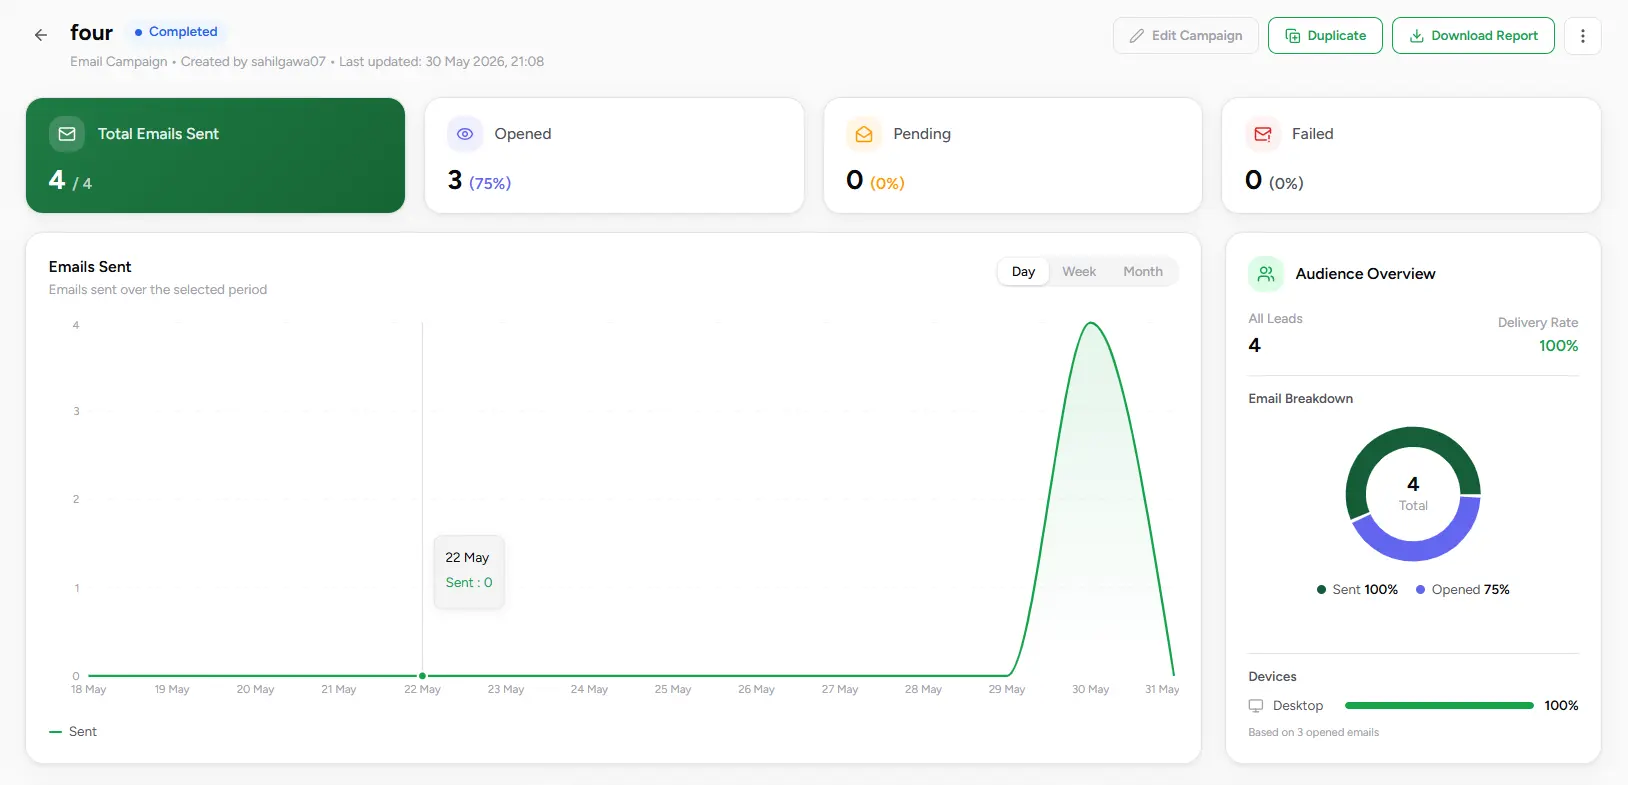
Performance Metrics
Track sent, opened, pending, and failed email counts with real-time campaign statistics.
Delivery Trends
Visualize email sending activity across day, week, and month time ranges.
Audience Insights
Review audience size, delivery rate, engagement metrics, and device statistics.
Email Preview
Inspect the email content and design currently being used by the campaign.
Campaign Configuration
Review sender details, scheduling settings, and campaign configuration information.
Sender Health
Monitor domain verification and sender reputation information.
Campaign Overview Metrics
| Field | What it means |
|---|---|
| Total Emails Sent | Total number of emails successfully processed and delivered by the campaign. |
| Opened | Number and percentage of recipients who opened the email. |
| Pending | Emails that are scheduled but not yet sent. |
| Failed | Emails that could not be delivered successfully. |
Campaign Analytics Dashboard
Review campaign metrics
Monitor sent, opened, pending, and failed email counts to evaluate campaign performance.
Analyze delivery trends
Use the chart visualization to understand sending activity across selected time periods.
Monitor audience engagement
Review delivery rates, audience size, and open statistics to measure campaign effectiveness.
Inspect email content
Preview the exact email template being used within the campaign.
Track recipient activity
View individual lead delivery status, open activity, and sending history.
Review sender health
Validate sender configuration and monitor deliverability readiness.
Review email content, sender information, campaign configuration, and scheduling settings.
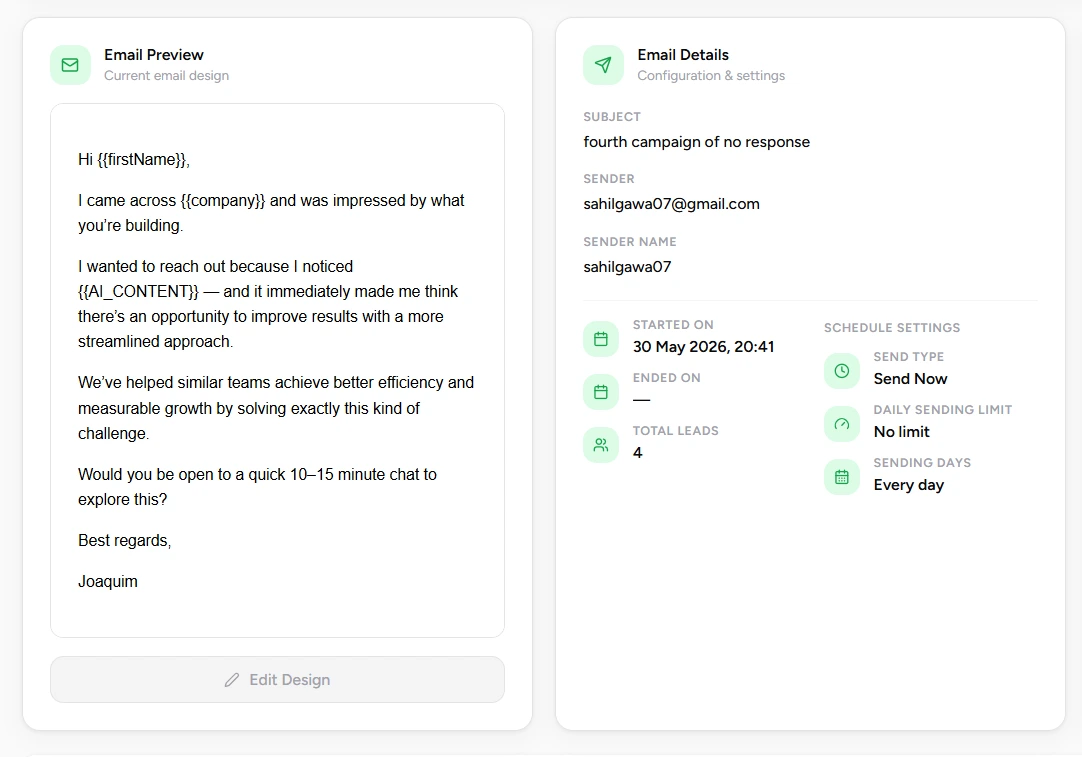
Email Preview
The Email Preview panel displays the email template currently associated with the campaign. This allows users to verify content, variables, formatting, and messaging before analyzing campaign performance.
Campaign Details
| Field | What it means |
|---|---|
| Subject | The email subject line used by the campaign. |
| Sender | Email account used to send campaign messages. |
| Sender Name | Display name visible to recipients. |
| Started On | Campaign start date and time. |
| Ended On | Campaign completion date and time, if applicable. |
| Total Leads | Total recipients included in the campaign. |
| Send Type | Defines whether emails are sent immediately or scheduled. |
| Daily Sending Limit | Maximum number of emails allowed per day. |
| Sending Days | Days on which campaign emails are permitted to send. |
Audience Overview
Delivery Rate
Percentage of emails successfully delivered to recipients.
Open Rate
Percentage of delivered emails that were opened by recipients.
Device Insights
Breakdown of email opens across devices such as desktop and mobile.
Sender Health
Sender Health displays domain verification and deliverability readiness information. Monitoring sender health helps ensure optimal email delivery performance and reduces the likelihood of deliverability issues.
Track delivery status, sending history, and open activity for every recipient included in the campaign.

Campaign Leads
The Campaign Leads table provides recipient-level tracking for all leads included in the campaign. Use this view to monitor delivery outcomes, email open activity, scheduling information, and sending timestamps.
| Field | What it means |
|---|---|
| Recipient | Lead name and email address associated with the campaign. |
| Status | Current delivery status such as Sent, Pending, or Failed. |
| Scheduled At | Date and time the email was scheduled for delivery. |
| Opened | Number of times the recipient opened the email. |
| Sent On | Actual date and time the email was delivered. |
Comprehensive campaign visibility
Track engagement in real time
Analysis & Admin
Manage profile, signatures, notifications, billing, and security
Settings centralizes account management, security preferences, billing information, email signatures, notification controls, and interface customization. Changes are saved directly to your account and apply across the platform.
Profile
Update your personal details, company information, and account settings.
Security
Manage passwords, account access, and future authentication settings.
Email Signatures
Create, edit, delete, and manage signatures used in campaign emails.
Notifications
Control campaign reports, email notifications, and system alerts.
Theme Preference
Choose between System, Light, or Dark appearance modes.
Billing
View plan information, monitor usage, purchase credits, and manage subscriptions.
Notification preferences
| Field | What it means |
|---|---|
| Email Notifications | Receive account activity updates and campaign-related notifications by email. |
| Campaign Reports | Receive recurring campaign performance summaries and delivery statistics. |
| System Alerts | Receive notifications about platform updates, service changes, and important account events. |
| Theme Preference | Choose System, Light, or Dark mode for the application interface. |
Theme options
Saving preferences
Plan limits
Email signatures
Analysis & Admin
Fix common product issues
Domain verification fails
Confirm the DNS name and value were copied exactly, check the correct DNS zone, wait for propagation, then verify again.
SMTP verification fails
Check host, port, username, password, app-password requirements, and whether the SMTP user can send as the selected from email.
Campaign is paused
Open the campaign detail page. Pause banners identify common causes such as insufficient credits, revoked OAuth, monthly limits, daily limits, or AI limits.
Leads are skipped during import
Leads missing email or first name are blocked from upload — fix these required fields in the review table or delete the rows. Leads with duplicate email addresses are automatically skipped and only the first occurrence is imported.
Emails go to spam
Verify DNS records, slow down sending rate, improve list quality, avoid misleading subject lines, and monitor failed or bounced sends.
CSV import looks wrong
Check headers, confirm email column is present, look for duplicate columns, and verify column mapping before confirming import.
Campaign stays in DRAFT and won't launch
Ensure all required steps are complete — leads uploaded, email content set, sender configured, and schedule set. All four wizard steps must be completed before a campaign can be launched.
Sender disconnected or OAuth revoked
Go to Settings and reconnect the sender mailbox. OAuth tokens can expire or be revoked from the email provider side. Reconnecting will resume paused campaigns using that sender.
Create Campaign or Add Lead button is disabled
Your plan limit has been reached. The Free plan allows up to 2 campaigns and a set number of leads. Upgrade your plan from the Billing settings page to increase these limits.
Still need help?
Use Support for tickets, help channels, FAQs, and chat. Include campaign ID, sender email, timestamp, screenshot, and any error message.
Open Support